I am running a LUKS partition on /dev/nvme0n1p1 and after applying yesterday's kernel patches and after reboot my system now acts a fool.
After that I typed in my boot password (LUKS) I am greeted by the famous recovery terminal with several repeats of:
libkmod: ERROR ../libkmod/libkmod-conf.c:712 kmod_config_parse: /etc/modprobe.d/$l_mname.conf line 1: ignoring bad line starting with '-e'
libkmod: ERROR ../libkmod/libkmod-conf.c:712 kmod_config_parse: /etc/modprobe.d/$l_mname.conf line 2: ignoring bad line starting with '-e'
And asking for my password to continue.
Then reading dmesg I notice:
device-mapper: table: 253:1: crypt: Error allocating crypto tfm
device-mapper: ioctl: error adding target to table
FAT-fs (nvme0n1p1): IO charset iso8859-1 not found
If I type exit I then get:
Failed to start default target: Transaction for graphical.target/start is destructive (emergency.target has 'start' job queued, but 'stop' is included in transaction).
I have tried selecting the previous kernel off the GRUB menu but it gives the same result.
After checking online for those messages I have found some resources suggesting to fsck the partition or to depmod then exit, it should fix it.
Of course none of that works.
What can I do to save my installation and restore my system's sanity?
"(...) I tried many of the suggestions that I found on askubuntu.com (like this one) but none of them solved the issue. After more Googling (and some panic), I was able to resolve the issue by:
1. Selecting Advanced Options on the GRUB boot menu. 2. Selecting recovery mode using the OLDEST version of the Linux kernel I had installed. 3. This booted me to the recovery screen.
4. I selected dpkg from the menu. This ran for a few minutes and when it completed successfully, I rebooted.
All seems to be well with the ThinkPad. I do not know what caused the problem, but the solution was quick and painless. (...)"
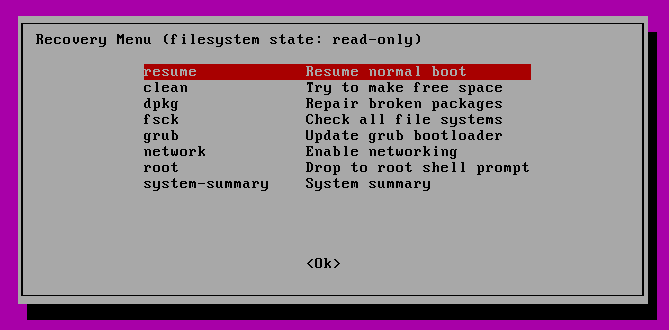
@DLS: Have you tried already that step of running "dpkg" from the "Recovery Menu" to "Repair broken packages"?
I did ended up doing something that made me boot for a one time into my TTY7 session.
However I was not able to redo it. And ended up reformatting.
I did tried using the Recovery Menu but I had problem cycling through the options normally (It ghosted the options a lot, I don't know how to explain this...).
Hopefully this thread will help somebody in the future....