Green screen after update. Unable to boot past logo

After clicking on update and then agreeing to reboot I got to the Ubuntu Mate Green logo then the screen turns green with black scan lines flickering on the right side of the screen. Then after about 2 minutes the screen just freezes green and num/caps lock buttons no longer work. I know there a lot of things I can do but I want to make sure I don't mess anything up. What's the proper procedure at this point?

(Worse case scenario I would at least like to recover my Firefox bookmarks and reinstall a fresh new Ubuntu Mate)

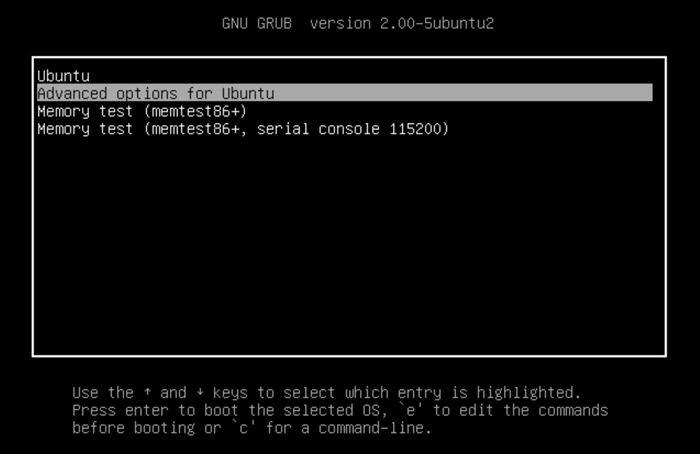
The first thing I would do is boot into recovery mode and pick an earlier kernel, then boot into that. Unless you have deleted it you should have at least one kernel that is earlier than the latest kernel.

If you had to reboot it would indicate a kernel was installed. If it boots correctly into the earlier kernel you will know there is a problem with the current kernel.

You can keep booting into the older kernel until the next kernel update or uninstall and reinstall the newer kernel if the kernel ends up being the problem.
This just happened to my wife's Ubuntu Mate 22.04 installation about a month ago.

4 Likes

Welcome to the club. Same problem. Have updated from the previous version 3 days ago. Boots up 1st time but when I switch off and restart a grey/greenish screen comes up, that's it.
I finally managed to get the Mate Logo login up by rebooting and playing around with the F1 and enter keys. Sorry this is not very technical. I have had to do this once or twice when I switched the laptop off at night.
I managed to get the GNU Grub version 2.12 up for a brief second flashing across the screen. The last time I dealt with GRUB was on a previous laptop that was partitioned but that is quite a few versions ago. Since then I had no dealings with the Grub setup, but my gut feelings says that this is the problem.
Ubuntu Mate 24.04 LTS.

Hi, @paul_jan :slight_smile:

(Usual disclaimer: please note that I'm just another Forum user here. I'm NOT a Ubuntu developer or Ubuntu MATE developer)

I usually do the following changes in the GNU GRUB (GRand Unified Boot Loader) configuration in my Ubuntu MATE installations, that may also help you. Please, edit the /etc/default/grub file with administrator privileges, by running the following command (that will open the "Pluma" text editor as superuser):

sudo pluma /etc/default/grub

In that /etc/default/grub file, change the following lines (in your case, these lines may appear in a different order from what I show here and you will probably find other lines in between, which you don't need to change):

GRUB_TIMEOUT_STYLE=hidden
GRUB_TIMEOUT=0
GRUB_CMDLINE_LINUX_DEFAULT="quiet splash"
#GRUB_DISABLE_OS_PROBER=false

... change those lines so they become the following ones:

GRUB_TIMEOUT_STYLE=menu
GRUB_TIMEOUT=10
GRUB_CMDLINE_LINUX_DEFAULT=""
GRUB_DISABLE_OS_PROBER=false

After doing that, please save and close the file, and then run the following command:

sudo update-grub

Please, copy the output of the execution of that sudo update-grub command to some text file, so you can also include that output in another reply from you in this same discussion topic.

Now, please reboot the computer and reply later, in this same discussion topic, to tell us if this solved the issue for you :slight_smile:

4 Likes

Pressed [Esc] right after the BIOS loaded. Saw a bunch of text scroll up on the left of my screen. Got a mouse for a second. Then a green screen, then a black screen, then a green screen with the black scan lines on the right side. Pressing [Shift] after BIOS does nothing. Thanks for the help so far, what is the next step?

Thank you ricmarques,

It worked like a charm, the grub_disable_os_prober=false had a # in front of it.
For reference sake I am just showing the original GRUB.

GRUB_DEFAULT=0

GRUB_TIMEOUT_STYLE=hidden

GRUB_TIMEOUT=0

GRUB_DISTRIBUTOR=( . /etc/os-release; echo ${NAME:-Ubuntu} ) 2>/dev/null || echo Ubuntu

GRUB_CMDLINE_LINUX_DEFAULT="quiet splash"

GRUB_CMDLINE_LINUX=""

If your computer has multiple operating systems installed, then you

probably want to run os-prober. However, if your computer is a host

for guest OSes installed via LVM or raw disk devices, running

os-prober can cause damage to those guest OSes as it mounts

filesystems to look for things.

#GRUB_DISABLE_OS_PROBER=false

Uncomment to enable BadRAM filtering, modify to suit your needs

This works with Linux (no patch required) and with any kernel that obtains

the memory map information from GRUB (GNU Mach, kernel of FreeBSD ...)

#GRUB_BADRAM="0x01234567,0xfefefefe,0x89abcdef,0xefefefef"

Uncomment to disable graphical terminal

#GRUB_TERMINAL=console

The resolution used on graphical terminal

note that you can use only modes which your graphic card supports via VBE

you can see them in real GRUB with the command `vbeinfo'

#GRUB_GFXMODE=640x480

Uncomment if you don't want GRUB to pass "root=UUID=xxx" parameter to Linux

#GRUB_DISABLE_LINUX_UUID=true

Uncomment to disable generation of recovery mode menu entries

#GRUB_DISABLE_RECOVERY="true"

Uncomment to get a beep at grub start

#GRUB_INIT_TUNE="480 440 1"

2 Likes

The next step would have been to ask you to issue this command:

inxi -CGxxz

but since you have no display, this won't work anyway.

The advice that @jymm gave you was spot on.
The linked article, however, contains an error.
It is not the ESC key but the SHIFT key that you need to hold during boot.

So, boot your PC while holding the shift key.

If you see that again, that means you are either too early or too late with holding the shift key.

Try hammering the key instead of holding it until a menu like this appears:

Choose Advanced options for ubuntu
You will see probably 4 entries, the one with the '*' in front is the kernel that will be booted by default.
Choose the other one (not the ones marked as rescue mode).

If you can boot now, you can start with keeping this menu visible at any boot for the time being. Follow the steps that @ricmarques showed in the post above.

Now issue the earlier mentioned command.

inxi -CGxxz

And post the output here.

3 Likes

Holding shift during the BIOS worked.

Details

My PC loadup: BIOS screen → grey screen (Ubuntu Only) →Ubuntu logo → Ubuntu Mate Desktop
[F1] & [Esc] made text briefly scroll up the left side of the screen. [Enter] did not seem to do anything. Pressing and holding [Shift] during the BIOS before the grey screen gave me the GRUB screen with menu options.

I got to the GNU GRUB version 2.06

  • Ubuntu
  • Advanced options for Ubuntu
  • UEFI Firmware Setings

(selecting "Advanced options for Ubuntu")

  • Ubuntu, with Linux 5.15.0-107-generic
  • Ubuntu, with Linux 5.15.0-107-generic (recovery mode)
  • Ubuntu, with Linux 5.15.0-73-generic
  • Ubuntu, with Linux 5.15.0-73-generic (recovery mode)

The first option gives me the green screen, the second option boots up normally with a low resolution, the 3rd option boots up my Ubuntu desktop normally.

Opened the 'grub' file in /etc/default and changed the GRUB_TIMEOUT_STYLE, GRUB_TIMEOUT, &
GRUB_CMDLINE_LINUX_DEFAULT. The grub menu shows up automatically now, Thank you.

results in:

Command 'inxi' not found, but can be installed with:

sudo apt install inxi
3 Likes

do

sudo apt install inxi

then

inxi -CGxxz

And post the output here.

3 Likes
CPU:       Topology: Quad Core model: AMD A8-9600 RADEON R7 10 COMPUTE CORES 4C+6G bits: 64 type: MCP arch: Excavator rev: 1 
           L2 cache: 1024 KiB 
           flags: avx avx2 lm nx pae sse sse2 sse3 sse4_1 sse4_2 sse4a ssse3 svm bogomips: 24798 
           Speed: 1397 MHz min/max: 1400/3100 MHz Core speeds (MHz): 1: 1397 2: 1398 3: 1425 4: 1399 
Graphics:  Device-1: Advanced Micro Devices [AMD/ATI] Wani [Radeon R5/R6/R7 Graphics] vendor: Micro-Star MSI driver: amdgpu 
           v: kernel bus ID: 00:01.0 chip ID: 1002:9874 
           Display: x11 server: X.Org 1.20.13 driver: amdgpu,ati unloaded: fbdev,modesetting,vesa compositor: marco 
           resolution: 1920x1080~60Hz 
           OpenGL: renderer: AMD CARRIZO (DRM 3.42.0 5.15.0-73-generic LLVM 12.0.0) v: 4.6 Mesa 21.2.6 direct render: Yes 

As far as I can see you don't have any weird stuff going on with respect to drivers or difficult hardware, that is a delight :slight_smile:

It is hard to pinpoint why your computer ended up with a non working kernel but is has happened in the past that some kernels were a bit problematic for some hardwareconfigurations.

So it all seems a bit of a fluke. I don't thing this will happen again as long as you avoid that one kernel.

You can modify your grub menu so that it always boots the kernel you want it to boot without manual intervention.
Read this:

You'd best upgrade to 22.04 because the 20.04 desktop is no longer supported. Maybe a fresh install would be a good idea at this point but you can try an in-place upgrade anyway:

sudo apt-get update &&
sudo apt-get dist-upgrade &&
sudo do-release-upgrade

If you want to stay on 20.04 (even though the desktop is not supported anymore, you still have 10 months of support left on the underlying OS) you'd best switch over to the HWE kernels to prevent this from happening again :slight_smile:

Good luck :+1:

3 Likes

Thank you all for the help. I can now boot up my Mate Desktop again.

gedit admin:///etc/default/grub

set GRUB_DEFAULT=saved
then under it I added the entry GRUB_SAVEDEFAULT=true

sudo update-grub

however it still boots to the green screen every time, even if I revert the entries suggested by @ricmarques

2 Likes

or

Which of these two contradictory statemens is it ?

Lol sorry, I should I have elaborated. I can boot up my Mate Desktop by selecting the kernel from the Grub menu which is good enough of a solution for me for now. I can't seem to boot into an Older kernel by default, a slight inconvenience.

You can if you edit the boot menu, or if you are not comfortable with that install grub-customizer which is a GUI program that makes it easy to do, and edit back when the newer kernel gets updated again.

sudo apt-get install grub-customizer

As I mentioned earlier in the post that is what I did with my wife's laptop when it happened to her. I also had to do it two other times when I had a Broacom WIFI card, that the kernel didn't support, then the next one worked.

3 Likes

Thanks for the suggestion, I would have done just that if I could not get a GRUB menu entry to work but I did:
GRUB_DEFAULT="Advanced options for Ubuntu>Ubuntu, with Linux 5.15.0-73-generic"