This tutorial will guide you through the steps necessary to install mpd+ncmpcpp+mpdscribble on your Ubuntu-MATE 16.04 machine. The result is a fully functional (and fun to use) music playing environment for the console, capable of managing your music collection and playlists, complete with a tag editor and scrobbling features.
All of this with only a minimal amount of resources needed:
 $ sudo ps_mem | grep -P '(mpd|ncmpcpp)'
  1.0 MiB + 438.5 KiB =   1.4 MiB    mpdscribble
 18.3 MiB + 894.0 KiB =  19.2 MiB    ncmpcpp
 26.6 MiB +   3.0 MiB =  29.6 MiB    mpd
##Contents
1. Install and setup mpd, the music player daemon
## 1. mpdOur first order of business is to get the MPD (Music Player Daemon) up and running.
This daemon runs in the background and is responsible for maintaining the music collection and serving requests from multiple music player clients. We are going to perform a user-based configuration of mpd, meant to run on a machine where the music library is installed on the user $HOME directory.
###1.1. Prepare your Music Library
The mpd daemon requires that all your music collection resides in a single directory tree. You can have as many sub-directories as you which; perhaps you like to organize your collection in a artist/album directory structure. But the whole collection needs to be stored in a single top directory.
A common choice is the ~/Music directory that Ubuntu-MATE already has created for you. But you can put your collection anywhere, as long as the top directory is located inside your user HOME folder.
mpd needs to have read and execute access permission to your music collection. Since we are going to setup mpd to run with the user credentials, that means you must have read/execute access to it.
mpd will gladly follow symlinks if it has permission to their target locations. So if your collection is indeed partitioned between different directories and you don't want to unite everything under a single directory, you can add symlinks to those other directories from within your "main" music directory. All those directories contents will be added to your collection.
This tutorial will assume you chose ~/Music as your Music Collection directory. If you didn't just replace it with your own path where appropriate.
###1.2 Install mpd
We are going to use the version distributed on Ubuntu-MATE official repos.
$ sudo apt-get install mpd
###1.3 Setup mpd
The Ubuntu deb package you just installed doesn't do much for you, other than installing files. You have to configure mpd yourself. So let's get started.
Disable the mpd service
The deb package distributed by Canonical that you just installed, setups mpd both as a service and as a user application on your startup applications (which in fact it shouldn't). For our purposes, we want to execute mpd as user, so we don't need the service and should promptly disable it.
$ sudo service mpd stop
$ sudo systemctl disable mpd.service
We stopped the service and disabled it so mpd won't start on next boot. So, currently mpd is not running and that's exactly how we want it... for now.
Prepare the configuration directory
The mpd daemon respects the XDG Base Directory Specification and we are going to take advantage of it. This way we can avoid cluttering the HOME folder with yet another dot-directory, and instead have the mpd files neatly stored in the ~/.config directory and the data files on ~/.local/share.
Create the mpd config and data directories:
$ mkdir ~/.config/mpd
$ mkdir ~/.local/share/mpd
I'm a fan of the XDG specification. It helps organize the contents of $HOME and avoids cluttering it with dot-directories. Every time a program allows me, I make use of it. However, you may not like it yourself. Fear not. mpd will also look for its configuration file in ~/.mpd/. So if you prefer that, you can ignore those two lines above and just create this directory. If you do that, do not forget to change the directories names accordingly for the rest of this section.
Copy the sample configuration file
The mpd daemon looks for a configuration file called mpd.conf. When you installed mpd, a sample file was installed on /etc. We are going to copy it to our configuration directory.
$ gzip -dc /usr/share/doc/mpd/examples/mpdconf.example.gz > ~/.config/mpd/mpd.conf
I know. Doesn't look much like a copy command. But the file is stored in a compressed gzip format. All we are doing is decompressing it to the standard output (screen) and then redirecting that to a new file called mpd.conf.
###1.4 Configure mpd
It's time to configure the daemon by editing the configuration file we just copied, located at ~/.config/mpd/mpd.conf.
If you open the file in a text editor, you may be a little overwhelmed, despite the well documented file. But it's a rather simple process to configure mpd at this stage.
I'm going to show you what you absolutely need in this configuration file. But I encourage you to explore the comments on the whole file and change the other options to your liking. And the end of this section I'm posting my full configuration.
Files and Directories
This first section describes where mpd should look for the music collection and its own data files. You need the following setup:
music_directory     "~/Music"
playlist_directory  "~/Playlists"
db_file             "~/.local/share/mpd/mpd.db"
log_file            "~/.local/share/mpd/mpd.log"
pid_file            "~/.local/share/mpd/mpd.pid"
state_file          "~/.local/share/mpd/mpd.state"
sticker_file        "~/.local/share/mpd/sticker.sql"
You must create the ~/Playlists directory, if it doesn't exist yet. This is where your playlists will be stored. mpd uses the m3u format with relative or absolute path names.
Don't forget to make the appropriate corrections if you decided to use different directories.
Did you know: All the files stored in the .local/share directory, according to the XDG Specification are so-called data files. These are transient files that are important during program runtime, but not necessary for program execution. When doing backups of your home folder, you can generally ignore .local/share.
Host address
The mpd daemon can be accessed by its clients through a network-based connection or through a socket. The default configuration is sufficient and may remain unchanged. But we are going to make it more explicit by forcing connections only through your localhost.
bind_to_address "127.0.0.1"
We left the port number at its default of 6600, but changed the address mpd listens to to your localhost.
Input plugins
This input plugin allows mpd to download lyrics or fetch information about artists ot tracks . If you are behind a proxy, check the comments in the configuration file for how to setup the plugin.
input {
        plugin "curl"
}
Output configurations
We need to tell mpd what output plugins it will use. We want to use Pulse Audio for sound, and a FIFO output if we want to have a pretty music visualizer in ncmpcpp.
audio_output {
    type        "pulse"
    name        "pulse audio"
}

audio_output {
    type        "fifo"
    name        "mpd_fifo"
    path        "/tmp/mpd.fifo"
    format      "44100:16:2"
}
Full configuration
And that's it. If you wish, here's my full configuration file. You'll see there's not much more to it. I just set a couple more options.
music_directory     "~/Music"
playlist_directory  "~/Playlists"
db_file             "~/.local/share/mpd/mpd.db"
log_file            "~/.local/share/mpd/mpd.log"
pid_file            "~/.local/share/mpd/mpd.pid"
state_file          "~/.local/share/mpd/mpd.state"
sticker_file        "~/.local/share/mpd/sticker.sql"

bind_to_address     "127.0.0.1"
log_level           "default"
restore_paused      "yes"
metadata_to_use     "artist,album,title,track,date"
auto_update         "yes"

input {
        plugin "curl"
}

audio_output {
    type        "pulse"
    name        "pulse audio"
}

audio_output {
    type        "fifo"
    name        "mpd_fifo"
    path        "/tmp/mpd.fifo"
    format      "44100:16:2"
}
###1.5 Run and test mpd
And, concerning mpd, we are done!
You can now execute it and check if everything is alright:
$ mpd
Looking at the log file should indicate everything is fine:
$ tail ~/.local/share/mpd/mpd.log
mpd is already set to autostart on boot, so you don't need to start it manually anymore. When you installed mpd, a new entry was added to your autorun applications. You can see it in your MATE panel menu, under
System->Preferences->Personal->Startup Applications
2. Install and setup ncmpcpp, the music player client for mpd
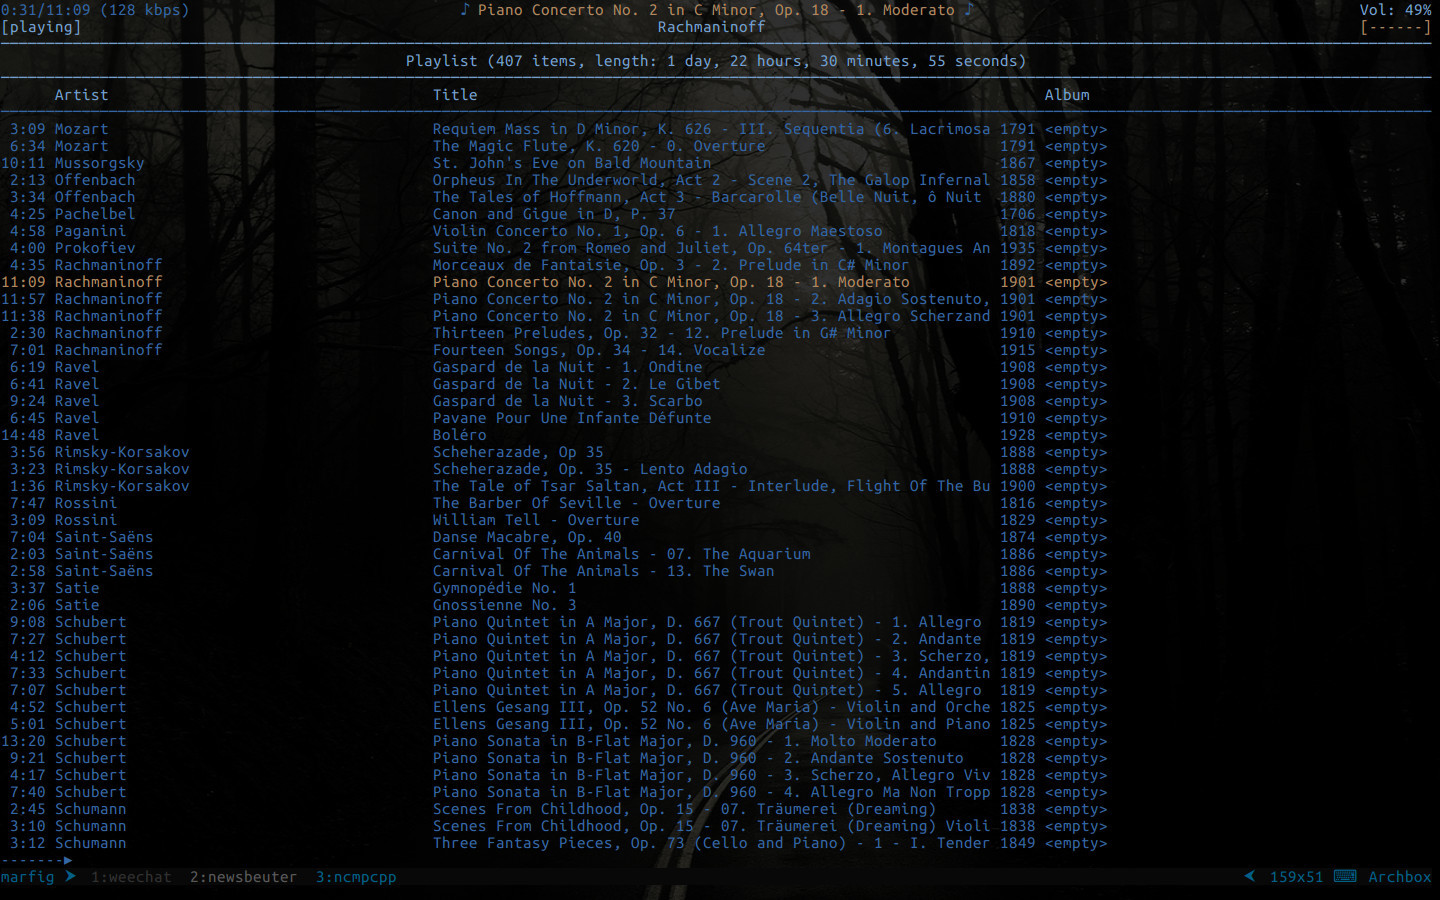
##2. ncmpcpp Now that the daemon was installed and configured, it is time to setup its client.ncmpcpp is the awkward name to a simple, but powerful, ncurses music client for the mpd daemon. It supports 256 color terminals and is highly configurable. It is through this program that you will be playing your songs, manage your playlists and even edit music file tags, if you so wish.
You are not limited to ncmpcpp. There are other mpd clients out there. You can see a list of them here, including full GUI clients like Sonata, Cantata or Ario. It's a long list.
###2.1. Install ncmpcpp
Like with the daemon, we are going to use Ubuntu-MATE repositories. Too easy...
$ sudo apt-get install ncmpcpp
###2.2. Setup ncmpcpp
ncmpcpp also supports the XDG Base Directory Specification, so we are going to set it up.
Prepare the configuration directory
We only need to set the configuration directory. ncmpcpp makes no use of data files with the exception of a log file that is really only useful for debugging purposes. We can keep that with the configuration files.
$ mkdir ~/.config/ncmpcpp
Copy the sample configuration file
The ncmpcpp music player looks for two configuration files, named config and bindings, for basic setup and key bindings configuration, respectively. Like before, we can copy to our configuration directory their sample files that have been installed for us in the /etc directory tree.
$ gzip -dc /usr/share/doc/ncmpcpp/config.gz > ~/.config/ncmpcpp/config
$ gzip -dc /usr/share/doc/ncmpcpp/bindings.gz > ~/.config/ncmpcpp/bindings
###2.3 Configure ncmpcpp
ncmpcpp is a graphical music player application (by graphical, I mean based on ncurses). It's configuration is largely a matter of user preference. The choice of colours and screen layouts are entirely subjective and not the matter of this tutorial.
I will be talking only about the mandatory configurations and let you decide for the rest. The configuration file is thoroughly documented within its comments and I encourage you to explore it. I will however show you my full configuration file at the end of this section (minus comment lines). And you can just copy/paste it if you so wish.
Files and directories
You will have to setup a few directory locations for ncmpcpp to look for and store files.
ncmpcpp_directory = ~/.config/ncmpcpp
lyrics_directory  = ~/Lyrics
mpd_music_dir     = ~/Music
ncmpcpp can download lyrics from the internet and store them locally for later retrieval. If ncmpcpp finds a file in the lyrics directory, it won't try to fetch it again when you open the lyrics pane.
The visualizer configuration
Back on the mpd daemon configuration, we set up a FIFO output. It is time to now configure ncmpcpp to make good use of it, by enabling it's pretty ascii visualizer.
visualizer_fifo_path = /tmp/mpd.fifo
visualizer_output_name = "mpd_fifo"
visualizer_in_stereo = yes
visualizer_sample_multiplier = 2
visualizer_sync_interval = 20
The multiplier at 2 seems to be good enough for quiet music and does not render badly loud music. Setting it to 3 worked even better at quiet music, but rendered loud music badly. You should test it yourself.
On my computer I had to lower the sync_interval to 20 to avoid some periodic micro-stuttering that I was experiencing. But I have a slow drive. You should probably be ok leaving this on the default 30.
Fail-safe options
A few options on the configuration file have sane values by default and protect your data. I'm showing the most important here anyways, so you don't make the mistake of blindingly changing it without understanding the consequences.
allow_for_physical_item_deletion = no
You really don't want to delete music files from within your music player. So make sure you leave that at no all the time.
Key bindings
ncmpcpp key bindings are defined in the ~/.config/ncmpcpp/bindings file. These are the defaults and you can simply delete this file if you never expect to change it. However, we need to add one important key binding to offset the fact its default value won't otherwise work.
The Help pane of ncmpcpp is especially useful to beginners of the application. It is by default accessed with the F1 key. This is not good on a terminal emulator. We are going to change it.
Add the following to the end of your bindings file:
def_key "9"
  show_help
Now, to access the help pane you just need to hit the 9 key.
It may look like a strange choice to you. However, ncmpcpp panes are accessed by the keys 1 through 8. This just sets the help pane key at a more logical place in your keyboard. Change it to something else, if you don't like it, but inspect carefully the
bindingsfile in search of duplicates.
Full configuration
And that's it, really. Those are the most important things you need to take care for in your ncmpcpp configuration file.
Configuring ncmpcpp can take you days of experimentation. There's a whole lot of options and the program is highly configurable. I encourage you to experiment and look on the Internet for other examples of configuration files. ncmpcpp is one of the linux applications with many examples available on the web on such places as reedit /r/unixporn channel, specialized dotfiles websites, on github dotfiles repositories and Deviantart.
Below is my full configuration file. You can use it as is, or adapt it to your needs. But I make use of 256 colors. So you need to make sure that in your ~/.bashrc file you have the following line:
if [ "$TERM" != screen-256color ]; then
    export TERM=xterm-256color
fi
Did you know: Ubuntu-MATE already does this for you, and you should see the
exportline in ~/.bashrc. However I suggest you take the chance and replace it with those 3 lines. If one day you wish to install the tmux or screen multiplexers, your ~/.bashrc won't overwrite the $TERM variable that they need to operate properly under 256 colors.
ncmpcpp_directory = ~/.config/ncmpcpp
lyrics_directory = ~/Music          # lyrics saved in music dir, see store_lyrics_in_song_dir
mpd_music_dir = ~/Music

visualizer_fifo_path = /tmp/mpd.fifo
visualizer_output_name = "mpd_fifo"
visualizer_in_stereo = yes
visualizer_sample_multiplier = 2
visualizer_sync_interval = 30

playlist_disable_highlight_delay = 3
message_delay_time = 3

song_list_format = {%n  }{%t}|{%f}$R%l
song_status_format = {$(13)%a$(end): $(138)%t$(end){ from $(5)"%b"$(end)}}|{%f}
song_library_format = {%n - }{%t}|{%f}
alternative_header_first_line_format = ♪ $(138){%t}|{%f}$(end) ♪
alternative_header_second_line_format = $(13)%a$(end){ - %b{ (%y)}}

now_playing_prefix = $(138)
now_playing_suffix = $(end)
browser_playlist_prefix = "$(138)m3u:$(end) "
selected_item_prefix = $(13)
selected_item_suffix = $(end)
modified_item_prefix = $3> $9

browser_sort_mode = format
browser_sort_format = {{%a} {%y} {%b} {%n}|{%t}}|{%f}

song_columns_list_format = (6f)[]{lr: } (25)[]{a} (3f)[]{nE: } (40)[]{t|f:Title} (5f)[]{yE: } (35)[]{b}

playlist_shorten_total_times = yes
playlist_show_remaining_time = yes

playlist_display_mode = columns
browser_display_mode = columns
search_engine_display_mode = columns
playlist_editor_display_mode = columns

autocenter_mode = yes
centered_cursor = yes

progressbar_look = "․⨪ "
progressbar_boldness = no

default_place_to_search_in = database

user_interface = alternative

media_library_primary_tag = artist

default_find_mode = wrapped

header_text_scrolling = yes
cyclic_scrolling = no
lines_scrolled = 1

follow_now_playing_lyrics = yes
fetch_lyrics_for_current_song_in_background = no
store_lyrics_in_song_dir = yes

allow_for_physical_item_deletion = no

screen_switcher_mode = previous

jump_to_now_playing_song_at_start = yes

ask_before_clearing_playlists = yes

clock_display_seconds = no

display_volume_level = yes
display_bitrate = yes
display_remaining_time = no

regular_expressions = extended

ignore_leading_the = yes

block_search_constraints_change_if_items_found = yes

mouse_support = yes
mouse_list_scroll_whole_page = yes

media_library_sort_by_mtime = no

enable_window_title = yes

search_engine_default_search_mode = 1

external_editor = vim
use_console_editor = yes

colors_enabled = yes
empty_tag_color = 240
header_window_color = blue
volume_color = 13
state_line_color = blue
state_flags_color = 138
main_window_color = blue
color1 = blue
color2 = red
main_window_highlight_color = blue
progressbar_color = 234
progressbar_elapsed_color = blue
statusbar_color = 240
alternative_ui_separator_color = blue
active_column_color = 138
###2.4. Run and test ncmpcpp
Well, with everything configured it is time to give ncmpcpp a test run. All should go well.
$ ncmpcpp
If you don't know how to use ncmpcpp yet, once it starts, hit the 4 key on your keyboard and that will take you to the Media Library pane. Hit enter on any artist and it should be added to your playlist and start playing.
You can go back to the Playlist pane by hitting the 1 key. Also, don't forget, we bound the 9 key to the help pane, where you can learn more about the program usage.
3. Install and setup mpdscribble, the mpd scrobbler
##3. mpdscribble We are approaching the end of this tutorial. One last application needs to be installed. The mpdscribble daemon allows you to integrate scrobbling features with mpd. It can make use of your account at _last.fm_, _jamendo_ or _libre.fm_.###3.1. Install mpdscribble
Just like with everything else we did on this tutorial, we are going to get mpdscribble from the Ubuntu-MATE repositories.
$ sudo apt-get install mpdscribble
###3.2 Setup mpdscribble
The setup and configuration of mpdscribble is rather simple and it won't take much time.
Disable the mpdscribble service
The mpdscribble daemon is installed as a service program. Just like with the mpd daemon, we don't want that since we want it to run as user.
$ sudo service mpdscribble stop
$ systemctl disable mpdscribble.service
We have stopped the service and disabled it so it won't run again on boot.
Add the mpdscribble daemon to your Startup Applications
We want for the mpdscribble daemon to start at boot. But as a user daemon that runs under the user credentials, not as a root service. We already took care of the latter by disabling the service. So now we just need to add it to our Startup Applications.
It doesn't really matter if the mpdscribble daemon starts before or after the mpd daemon. mpdscribble will keep trying to connect to mpd until it succeeds. The only thing that matters is that the mpd daemon is running when you start scrobbling. Since this only happens after you run the ncmpcpp player and start a song, that is pretty much guaranteed.
So,
- Go to the MATE Panel menu at System->Preferences->Personal->Startup Applications
- On the Startup Programs pane, click the +Add button.
- On the
namefield you can write:MPD Scrobbler Daemon - On the
commandfield you can simply type:mpdscribble - And on the
descriptionfield you could perhaps write:Start mpdscribble on boot as user
And we are done here. Click on the +Add button to add this new entry and close the Startup Applications window.
Prepare the configuration directory
mpdscribble installation, like its friends, does not prepare anything for us. We have to manually set it up and configure it if we wish to run it as user.
The daemon does not support the XDG Base Directory Specification. It will look for its configuration file only on ~/.mpdscribble/mpdscribble.conf. So let's go ahead and create its configuration directory.
$ mkdir ~/.mpdscribble
Copy the sample configuration file
We can also bring into the configuration directory a sample configuration file from the /etc directory.
$ sudo cp /etc/mpdscribble.conf ~/.mpdscrible/
$ sudo chown $USER:$USER ~/.mpdscribble/mpdscribble.conf
We copied the sample configuration file and the second command gives us ownership over the copied file. The second command was necessary because we tried to copy a file from which we have no read access permission. So we had to use the sudo command. Because of this, the file was copied to our directory with root still as the owner and we wouldn't be able to edit it.
The mpdscribble daemon does not support the XDG Base Directory Specification, but the daemon can be started with the
--confoption that allows us to specify a diferent configuration file location. For simplicity sake I'm not taking advantage of it at this stage. But in the last part of this tutorial, I'm going to show you a different way to start the whole suit of applications, without relying on Startup Applications. I will then take the opportunity and move everything to the .config folder and use the--confoption.
###3.3 Configure mpdscribble
We now just need to configure the mpdscribble daemon by editing the file we just copied.
The configuration file is rather simple compared to the two we have done before. So, I'll invert what I have been doing so far and show you a fully configured file contents first, and make any remarks after.
This is all you need to configure mpdscribble:
Assuming a linux user account named marfig, using a last.fm account under the name of mario.
[mpdscribble]
log = /home/marfig/.mpdscribble/mpdscribble.log
verbose = 2

[last.fm]
url = http://post.audioscrobbler.com/
username = mario
password = 748f1e...27
journal = /home/marfig/.mpdscribble/lastfm.journal
Logging
It's a good idea to enable logging for mpdscribble. The level 2 logging is ideal since it lets you know of any errors and also shows you the scrobble state of each file.
HTTPS vs. HTTP
The last.fm service supports secure connections over https. But its very fickle and not always works. The sample file points to the last.fm scrobbler address at http://post.audioscrobbler.com/. We are going to leave it as is, but once and a while keep checking this setting to see if its now fully working. You just need to change http to https.
Do not put your password on the config file
The mpdscribble daemon needs your password to connect to last.fm. So you actually need to write something on the configuration file on the password field. Fortunately, the program doesn't expect your real password, only a MD5 hashed version of it.
To generate an md5 hash of your password, run the following command (by entering your real password between single quotes). Then copy the command output to the password field in the configuration file (an example output is also shown):
$ echo -n 'your_password' | md5sum | cut -f 1 -d " "
1060b7b46a3bd36b3a0d66e0127d0517
Caching
The mpdscribble daemon can cache your scrobbles when you are not online. It will dump the cache to last.fm when you connect to the internet. You specify where this cache is stored in the 'journal' field.
###3.4 Run and test mpdscribble
And that's it. With this we finish our music triumvirate.
To test the mpdscribble daemon, just start it (and also start mpd if it is not already).
$ mpdscribble
Execute ncmpcpp and start a song. On another terminal window type the following:
$ tail ~/.mpdscribble/mpdscribble.log
You should see something like this:
[last.fm] handshake successful
new song detected some_song_file, id: 45, pos: 1
[last.fm] sending 'now playing' notification
[last.fm] OK
The first line means you connected to last.fm just fine.
The second line tells you mpdscribble got a notification from mpd that a new song started.
The third line tell you mpdscribble sent this information to last.fm
The last line is last.fm response.
4. On-demand launch; an alternative way to start the whole suit
##4. On-demand launch; an alternative way to start the whole suit I don't start the _mpd_ and _mpdscribble_ at boot. Not always I am listening to music and I find it wasteful to have these daemons run on the background if I am not making use of them. Even if their total memory consumption is so low.I'm going to show you, how I actually define the execution plan of mpd + mpdscribble + ncmpcpp. It is based on the simple principle that the two daemons should only start when I launch ncmpcpp to start listening to music.
###4.1. Remove or Disable the Startup Applications entries
We won't be starting mpd or mpdscribble at startup. So we want to disable or remove entirely their entries from the list of Startup Applications.
We can do that from the MATE Panel Menu at System -> Preferences -> Personal -> Startup Applications.
###4.2. Create an alias to launch the daemons when starting ncmpcpp
This is the bulk of what you need to do. We are going to create an alias with the same name of the ncmpcpp program, that inspects the current system and decides whether it should launch the daemons. I'm going to show the alias first, and talk about it next.
ncmpcpp() {
    if ! pidof "$(type -P mpd)" >/dev/null; then
        mpd
        if type -P mpdscribble >/dev/null; then
            killall mpdscribble >&/dev/null
            mpdscribble
        fi
        $(type -P ncmpcpp) "$@"
    else
        $(type -P ncmpcpp) "$@"
    fi
}
This code goes to the end of your ~/.bashrc file, or to wherever you are placing your aliases. If you notice, the ~/.bashrc file installed by Ubuntu-MATE has a line that looks something like the following somewhere towards the end of it:
# User alias definitions go into ~/.bash_aliases.
# See /usr/share/doc/bash-doc/examples in the bash-doc package.
if [ -f ~/.bash_aliases ]; then
    . ~/.bash_aliases
fi
So you can create the ~./bash_aliases file and save the above alias there. It will be loaded by ~/.bashrc every time you open a new terminal. Or if you prefer, just place it at the end of the ~/.bashrc file.
What is the alias doing?
What the alias is doing is checking if mpd is already running. If it is not, then it launches it, and checks if mpdscribble is installed. If it is, kills any instance of mpdscribble that may be running and relaunches that too. Then it finally launches ncmpcpp.
But if mpd is already running, then it assumes mpdscribble is too and then just launches ncmpcpp.
ncmpcpp is being launched from the PATH, so there is no risk this alias clashes with the application name and gets you stuck in a loop calling itself over and over again when it tries to start the program ncmpcpp.
Why am I doing this
This way, the first time I start ncmpcpp, it will launch the two daemons for me before starting itself. I can start multiple instances of ncmpcpp, but only the first launches the daemons. So, I don't have my memory resources squandered by a couple of unused daemons (as light as they might be).
Note that I don't close the daemons when I stop using ncmpcpp. I can do this manually if I have to.
$ mpd --kill
$ killall mpdscribble
I prefer to do it manually, because while I like the idea of passing the control to start daemons to a script, I prefer to have manual control over when to stop them.
###4.3 Move mpdscribble to ~/.config
As I mentioned before I prefer the recommendations in the XGD Base Directory Specification than to have my $HOME firectory crowded with configuration files and directories. So every time a program supports it, I prefer to set its configuration directory inside ~/.config. We have been doing that on this tutorial.
The mpdscribble daemon was the exception because it doesn't support it. However it can be started with a -- conf option that lets you define the location of its configuration file. So we will now use it.
This is not mandatory. Just an optional addition to this already lengthy tutorial, to show you that under most circumstances you have quite a bit of control over how programs look for their files (when those programs are well designed).
Stop mpdscribble
We need to stop mpdscribble. It's as easy as killing it from the command line.
$ killall mpdscribble
mpdscribble will be gently killed. You can see this from its log file that will show it was gracefully shutdown.
Move the .mpdscribble directory inside ~/.config
We now just simply move the configuration directory inside ~/.config.
$ mv ~/.mpdscribble ~/.config/mpdscribble
Notice we also renamed it from .mpdscribble to mpdscribble. The ~/.config location doesn't require dot-directories.
Edit the configuration file
We need to make changes to the configuration file to account for the new location of the cache and log files.
So edit ~/.config/mpdscribble/mpdscribble.conf and change the log and journal entries to what you see (altering the user account name, of course).
log = /home/marfig/.config/mpdscribble/mpdscribble.log
journal = /home/marfig/.config/mpdscribble/lastfm.journal
Edit the alias to call the configuration file
So now we just need to edit the alias we created before to call this configuration file.
You want to change this line:
mpdscribble
To this:
mpdscribble --conf "$HOME/.config/mpdscribble/mpdscribble.conf"
So now, when mpdscribble is started, it will look for its configuration file in its new place.
###4.4 Restart mpdscribble
And that's it. Start mpdscribble again and all should go well
$ mpdscribble
###Changeset
2016/08/26
- fixed: wrong information on mpdscribble HTPPS connection
- added: information on mpd host address
- fixed: small improvements to text
2016/08/29
- fixed: better ncmpcpp full configuration example
