Ubuntu MATE HiDPI - First Steps

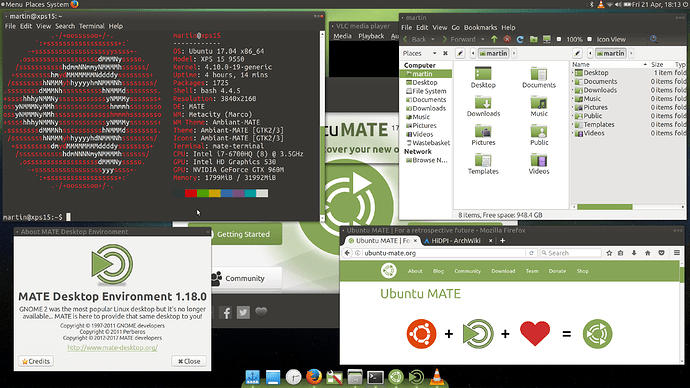
This is by no means perfect and its kinda hacky to get it to work, but here are the first baby steps towards HiDPI for Ubuntu MATE.

The screenshot below was taken on my Dell XPS 15 with 15.6" 4K Ultra HD (3840 x 2160) InfinityEdge touch screen running Ubuntu MATE 17.04 plus some dirty hacks.

10 Likes

Really nice to see things progressing, - really appreciate all the work you and the Mate team do. Hoping Ubuntu remains a resilient and stable platform for you.

1 Like

Thanks for sharing your progress Martin. Appreciate all who are working on Ubuntu Mate.

1 Like

As ventilated on other communication channels before… I really like the fact that time and effort is spend to look into HiDPI. It is something that is not working properly across many desktop environments and is highly appreciated when you use a 4K display. Get this implemented the right way and MATE is again one step ahead :thumbsup:

I’ve seen a few references to plans for GNOME, maybe in 3.26, to support non-integer scaling. Hopefully MATE can take advantage of that too.

1 Like

That is rather interesting information. Proper HiDPI support in GTK/GNOME might e the impulse it needs for al DE’s who are build on it.

Yes, most of the available resolutions for my xps-13 (3200x1800) seem to be non-integers and thus waste gobs of real estate.

With a bit of tweaking with font and icon sizes you already can get a way with a high res (I run at 3840x2160 60Hz) but it is not as nice as well implemented Windows 10 or more specific macOS where scaling is beautiful.

That’s awesome!

I’m really looking forward to HiDPI support.

Do you think there is a chance that it will be in the next LTS?

I just completed the installation of UM17.10 on my Dell XPS 13. After much experimentation on UM17.04 and on UM17.10-beta2 in a VM for the book 'Using Ubuntu MATE and Its Applications," I discovered a much simpler approach than the one I documented in the book. This simpler approach uses xrandr alone to apply a scaling factor when using the 3200x1800 setting. Maybe some variation on this approach might aid in the development of a simple scaling factor for use with UM going forward. That, of course, assumes that we continue to provide xrandr by default in the distribution. Here is the script I am currently using at startup. It seems to be working flawlessly. Now, if I could only find a way to trigger the script when the screen resolution changes…

#!/bin/sh
# set4k script
#
# Sets scaling of HiDPI (3200x1800) screen to scale so that it is large enough
#  to read on the 13" XPS 13 screen. Run as a startup application or as a panel 
#  or destkop launcher.

# This is the version for Ubuntu MATE on the Dell XPS13 9360
# ##########################################################
# Larry Bushey
#

# In this version, we use xrandr to see if the HiDPI setting is in use 
#  (xrandr | grep '3200x1800     59.98\*') and if it is, then we use a scaling
#  factor of 0.6, which seems to be the equivalent of about a 2X increase in 
#  size. If not, we set the scaling factor to the default of 1. Then we use 
#  notify-send to announce the change to the user. This is very specific to 
#  my XPS 13 screen. 
#
if [ $(xrandr | grep '3200x1800     59.98\*' | gawk -F '.' '{ print $3 }') -eq 99 ]; then
    xrandr --output eDP-1 --scale 0.6x0.6 
	notify-send --icon=/usr/share/icons/mate/48x48/actions/zoom-fit-best.png "HiDPI scaling enabled."
else
    xrandr --output eDP-1 --scale 1x1  
	notify-send --icon=/usr/share/icons/mate/48x48/actions/zoom-original.png "HiDPI scaling disabled." 
fi

# In this version, we use xrandr to see if my second 1080P monitor (DP-1) 
#  is connected and if it is, then we assume that the HiDPI screen (eDP-1) is 
#  set to 3200x1800 and use we a scaling factor of 0.6, which seems to be the 
#  equivalent of about a 2X increase in size. If not, we set the scaling factor 
#  to the default of 1. Then we use notify-send to announce the change to the 
#  user.  
#
#if [ $(xrandr | grep 'DP-1 disconnected' | gawk -F ':	' '{ print $2 }') -eq 0 ]; then
#    xrandr --output eDP-1 --scale 0.6x0.6 --output DP-1 --scale 1x1 --right-of eDP-1  
#	notify-send --icon=/usr/share/icons/mate/48x48/actions/zoom-fit-best.png "HiDPI scaling enabled." 
#else
#	xrandr --output eDP-1 --scale 1x1 --output DP-1 --scale 1x1 --right-of eDP-1  
#	notify-send --icon=/usr/share/icons/mate/48x48/actions/zoom-original.png "HiDPI scaling disabled."
#fi

[Edit] Now I see that this is the equivalent of simply changing the screen resolution to 1920x1080. (I could have done that myself, without the script.) The mate-display-properties app still reports 3200x1800, but screenfetch shows the resolution to be set at 1920x1080. Well, I guess that IS how scaling works, after all.

1 Like

Interesting, @goinglinux. What’s cool about this method is that it is distro/DE/toolkit agnostic. I think this method is also described in this thread:

https://forums.linuxmint.com/viewtopic.php?t=159064

However, correct me if I’m wrong. Doesn’t this method have a serious flaw?; if you open a high-res picture in a picture viewer you won’t see the picture in full resolution because everything including content has been scaled? The purpose of scaling is making UI elements bigger, not content because content can be scaled by picture viewers, web-browsers, video-players etc. You effectively lose pixels by scaling this way. You can’t display a 2000 pix wide image on a screen that effectively only uses 1600x900 pixels. So if this is how it works this is more of a “HiDPI workaround” than effectively using the HiDPI-screen.

I don’t know what GTK 3 is capable of, but If you use Ubuntu MATE 16.04 or XFCE or LXDE GTK 2 environment you can achieve good HiDPI support (bigger UI - no pixels lost) by:

Increasing font DPI in Appearance > Fonts > Details
Using HiDPI theme/window-border like this one:

This thread has all the steps in XFCE (post 12):
https://forum.xfce.org/viewtopic.php?id=9718

Last but not least, there is a nice zoom add-on for Firefox called Zoom Page:

Some websites use “responsive design”, but some don’t and you need to scale those to be able to read the content. This add-on works amazingly well. You can set default zoom-level (say 150%), but it will also remember zoom-settings on a per site basis.

It's a "HiDPI workaround", but it can still be useful. It's a form of scaling but it doesn't take advantage of your HiDPI screen. I'm impressed you did this, because it seems a little complicated.

@mrtribute, as you can see by my edit, I figured out that my approach really does nothing except change the resolution for the entire screen, really not doing much that you can’t do with the usual GUI tools in Ubuntu MATE. Thanks for the additional links, though.

FYI, here is a link to my article that summarizes the longer route, using GUI settings, I used to actually make use of the full 3200x1800 screen. I’d really like to find something simpler, though. http://goinglinux.com/articles/HiDPIonLinux_en.htm

1 Like

Thanks for the link. Your screenshots show that the font DPI setting is still present in MATE GTK 3. This means MATE GTK 3 should be able to scale just like MATE GTK 2. This is a big advantage because:

  1. It offers incremental scaling to fit any screen
  2. It treats all toolkits the same, because they all react the same to bigger fonts

I understand when you say you want something simpler. The default Ubuntu MATE iso will always be a certain way and then users have to make adjustments that suit their needs.

Of course things could be automated in MATE Tweak like panel layouts. Choose a DPI (easy names like 100 %, 133%, 150%, 166%, 200%) and all appropriate settings will be adjusted.

The easiest way would probably be to provide an alternative iso with default setting 2x scaling. That way live-experience and installation wouldn’t be a problem for HiDPI users. Another possibility would be providing just one iso which auto-detects screen-resolution and chooses appropriate settings for HiDPI screens.

Which brings me to this conclusion: This thread is called Ubuntu MATE HiDPI - First Steps, but judging from your screenshots MATE GTK 3 already has good HiDPI support. What is lacking are 2x themes (1,5x too) and an easy way to control icon-sizes (either defined by the theme or in dconf Editor).

HiDPI support is really about having enough graphical assets. MacOS can get away with creating a 1x theme and 2x theme, because Apple controls the hardware. For proper support of any screen Linux should offer at least default theme in 1x, 1,5x and 2x size.

KDE5/QT5 offer scaling of themes and I don’t know how that works (maybe KDE5 uses Scalable Vector Graphics?), because I don’t think they created 10+ variations of each theme. It’s an interesting concept. I don’t know how well it works. Experience tells me KDE/QT always win in theory, but not in real life.

Icon themes need to support many different icon sizes. Good HiDPI-support is a lot of work, but HiDPI is the future of screen technology.

1 Like

I will soon be publishing a blog post that explains how to enable and configure the experimental HiDPI support in Ubuntu MATE.

2 Likes

Wimpy, if possible, please include Ubuntu Mate 16.04 in the writeup. We have to stick with that version because of certain commercial applications. Thanks!
Dow

Ubuntu MATE 16.04 is based on GTK2 and therefore has no HiDPI capability. Sorry.

It would be nice if you could explain this. I have seen this statement in several places and it frustrates me every time, because GTK 2 is useful on HiDPI displays.

I would like to know what is special about GTK 3. There are many elements; fonts, themes, icons for a good HiDPI experience and I find it unlikely that GTK 3 has a magical solution. But I don’t know and that’s why I would like to know more. Just based on what other users are saying the font DPI setting found in MATE, XFCE, LXDE seems just as good as anything found in GTK 3. Several users say MATE is better than Gnome, Cinnamon and Elementary so saying MATE GTK 2 has no HiDPI capability seems wrong to me.

Hey Wimpy I have the same laptop. I’ve tried to put Ubuntu - Mate and standard Ubuntu on it and with no success. What am I doing wrong. Ive searched many wiki’s and forums but no one has info on the 15" 4k xps.

@darlcole - I have the Dell XPS 15 (9560) running Ubuntu MATE. It took a bit of tweaking, but I got a very stable system in the end. I’m going mostly from memory here as to what the process was, but here it goes:

First, you need to go into the BIOS and do the following:

  • Change the SATA Mode to “AHCI”
  • Change Fastboot to “Thorough” in “POST Behaviour”
  • Disable secure boot
    Warning: I suspect that some of these settings (especially the secure boot one) might actually mess up whatever other OS you have installed (i.e. Windows) and make them unbootable. I don’t have Windows on mine, so I have no way of knowing this for sure. The Dell website has some surprisingly good documentation on the BIOS settings for running Linux on the XPS line, so I would strongly encourage you to dig there first.

Then, you will need to add some kernel parameters to GRUB. I think you can get to those by pressing 'c' when on the boot menu (where it asks you whether you want to run a live CD or install right away). Once you install it, you need to make those parameters permanent by going into /etc/default/grub and make sure that they are there as well.

So, for the kernel parameters, on the line that starts with GRUB_CMDLINE_LINUX_DEFAULT, make sure that it has the following values:

GRUB_CMDLINE_LINUX_DEFAULT="quiet splash acpi_osi=! acpi_osi=\"Windows 2009\" acpi_osi=Linux acpi_rev_override=5 acpi_backlight=vendor enable_fbc=1 enable_psr=1 disable_power_well=0"

The key ones there are the acpi_osi and the acpi_rev_override. They should allow you to fully install and run Ubuntu MATE.

The acpi_backlight one makes it a bit nicer to use the backlight keys, in my opinion. Doesn’t really seem necessary, I guess, but I’m not touching this file now that my computer works :stuck_out_tongue:. The enable/disable ones make the system consume less power.

I also installed tlp (better battery management) and bbswitch-dkms (allows for auto-toggling the nvidia card).

With this configuration, I get close to 10 hours of battery life when using the Intel video drivers, a lot less with nvidia, of course.

Most of this info I got from the Dell website docs for the XPS line and the Arch wiki, as well as several days of back-and-forth reformatting and starting over.

Good luck! :slight_smile:

3 Likes