If you have a convertible touchscreen laptop, and if you have installed the Touchscreen Utilities (Touchscreen Utilities - #8 by DaveHighland), then you can use Ubuntu Mate to display PDF sheet music. With your laptop’s screen in portrait orientation, propped on your music stand, you can display each page of sheet music in fullscreen mode, and you can use the touchscreen to flip forward or backward through the pages. You can even tap on internal links to jump to the target page of a repeat sign, da capo, dal segno, or coda.
(If your touchscreen laptop isn't convertible, you may still be able to use it to read sheet music, even without the Touchscreen Utilities. If your laptop’s screen can rotate 180 degrees so that it lies flat on a music stand, there’s a way you can use the Okular PDF reader to display sheet music, but the touchscreen controls are a little different. More on that later.)
- Download some sheet music in PDF format. Visit https://www.mutopiaproject.org to browse and download sheet music. This site offers more than 2000 pieces of free sheet music that is either in the public domain or under Creative Commons license. The music has been typeset using the free-and-open-source LilyPond software, and then rendered in PDF documents. For this tutorial, I’ll use Scott Joplin’s 1908 “Pineapple Rag” as an example (https://www.mutopiaproject.org/ftp/JoplinS/PineappleRag/PineappleRag-let.pdf).
A brief word about what doesn’t work: Although LilyPond is an excellent tool for typesetting sheet music, the resulting PDF file contains musical notation elements (staves, clefs, noteheads, accidentals, etc.) that are individually selectable objects. This is much the same as a PDF text document that contains letters, words, and punctuation characters that are selectable. If you’re only going to display the PDF sheet music, no problem. Most PDF readers can render Project Mutopia files faithfully. However, if you need to edit the PDF to add internal links, most of the free PDF editors have trouble retaining the LilyPond elements and formatting. As a result, some of the musical notation elements vanish from the resulting PDF.
The solution: Convert each page of music to a jpeg image before editing.
- Convert each page of the PDF to a jpeg image. Open a terminal window and navigate to the directory where you downloaded the PDF music document. Then enter the following ImageMagick command, substituting the name of your input and output files if they are different than the example shown below:
convert -density 300 PineappleRag.pdf -quality 90 -compress jpeg PineappleRag-1.pdf
Note: The convert command should come pre-installed on Ubuntu MATE 24.04. But if for some reason the terminal reports that the command can’t be found, you’ll have to install the ImageMagick package. Use these commands:
sudo apt update
sudo apt install imagemagick
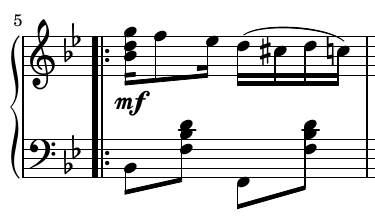
- Add internal links. An internal link is blue text that you can click or tap to navigate to another page in the document. Adding these links makes performing a piece much easier; with a quick tap you can navigate forward or backward to the target page indicated by a direction symbol. To add an internal link, open your converted PDF using LibreOffice Draw. In our Pineapple Rag example, the fifth measure on page 1 begins with a repeat sign (a bold double-bar line with two pairs of dots):
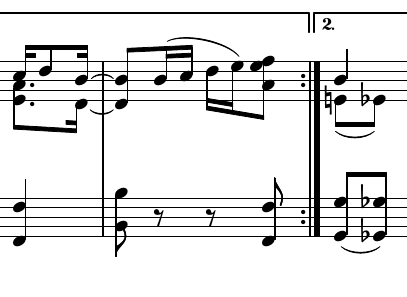
This opening repeat sign begins a passage of music that ends with a closing repeat sign following the fourth measure on page 2:
Now we’ll add an internal link to the closing repeat sign on page 2. When tapped on your touchscreen, this link will turn back to page 1.
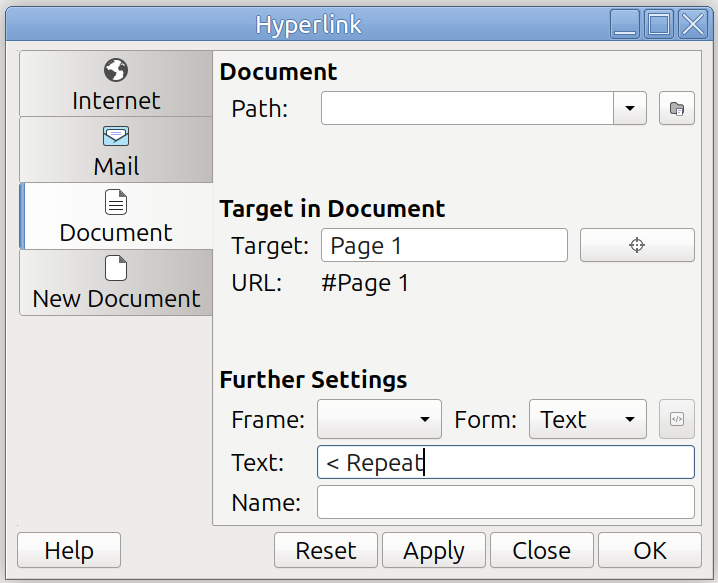
Begin by centering the closing repeat sign in the LibreOffice Draw window. Now, from the Insert menu, select “Hyperlink…”
in the Hyperlink dialog box:
- Select the “Document” tab on the left.
- Under the “Document” heading on the right, delete the contents, if any, of the “Path:” text box.
- Under the “Target in Document” heading on the right, click the button with a crosshairs icon. A “Target in Document” dialog box opens with a hierarchical tree list. Expand the “Slide” item and select the “Page 1” element. Now click the “Apply” button, and then click the “Close” button.
- Back in the Hyperlink dialog box, under the “Further Settings” heading on the right, in the “Form” combo box, select “Text”.
- Under the “Further Settings” heading on the right, in the “Text:” box, enter the text for the link. For this example, I entered “< Repeat”. This is the text that will appear as the blue link in your PDF document.
The Hyperlink dialog should now look something like this:
Now click the “Apply” button and then click the “Close” button.
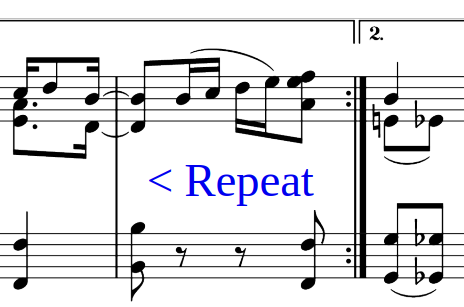
A text box with “< Repeat” in blue now appears in the LibreOffice Draw window. Move this box into position near the closing repeat symbol on page 2. If the text is too large to fit where you want it, you can adjust it by selecting the text box, clicking on the “Format” menu, and selecting “Text > Decrease Size.” Repeat if necessary, but be careful not to make the link too small. It needs to be large enough that you can quickly tap it while performing the piece. (Another Tip: You can hold down the Alt key and press the arrow keys to nudge the link precisely into position.) The final result should look something like this:
Repeat this procedure for the other direction symbols in the piece. For example, you can insert backward links for da capo and dal segno direction symbols, or a forward link to a coda.
When you have finished inserting links, click on the “File” menu and select “Export As” > “Export as PDF…” and the PDF Options dialog opens. The default values are usually adequate, with one exception: On the “Links” tab of this dialog, make sure you check the box next to “Convert document references to PDF targets.” If this option is not selected, the links you so carefully placed will not work.
Finish by clicking the “Export” button. Now an Export dialog box opens. Select the folder and filename for the revised PDF document. For this example, I chose the name “PineappleRag-1-linked.pdf”. Click the “Export” button. A progress bar along the bottom edge of the LibreOffice Draw window tells you when the operation has completed. Now close LibreOffice Draw. The program will prompt you to save changes; click the “Don’t Save” button unless you also want to save your work as a drawing file.
- Display the linked PDF using the Okular universal document reader. Designed primarily for reading and annotating PDF documents, Okular has the most touchscreen-friendly interface of all the PDF readers I tried. If you don’t have Okular installed on your laptop, use these commands:
sudo apt update
sudo apt install okular
If you have installed the Touchscreen Utilities, tap the Mode Switcher icon in the dock to switch your laptop to tablet mode. Fold your keyboard back behind the laptop screen and place the laptop in portrait orientation on your music stand. (Tip: You can use a chip-clip or Velcro to secure your laptop to your music stand.)
Now use Okular to open your PDF music document with links. You’ll need to make a few settings adjustments to Okular. First, click the Settings menu and select “Configure Okular”. Select the “Presentation” tab on the left. On the right side, change the “Touch navigation:” setting to “Tap left/right side to go back/forward”. Click the “Apply” button and then click the “OK” button.
Now from the View menu select “Trim View” and check the box in front of “Trim Margins”. This will display each page slightly larger.
Finally, from the View menu select “Presentation”. Your sheet music will be displayed with one full page on the screen in portrait mode:
-
You can advance to the next page either by swiping left or by tapping the right edge of the screen. (Tapping is quicker if you are performing the piece.)
-
You can go back to the previous page either by swiping right or by tapping the left edge of the screen.
-
You can tap any blue link to go directly to the target page for that link.
-
To exit Presentation mode, slide your finger up to and past the upper edge of the screen. This will trigger the Helper Bar to appear. Tap the “Exit Presentation Mode” icon at the right end of the Helper Bar. (The icon is an arrow pointing to a door ajar. This icon may be partially hidden when the screen is in portrait orientation, but just tap at the very right end of the Helper Bar to exit Presentation mode.)
If your touchscreen laptop isn’t convertible (i.e., the screen doesn’t hinge 360 degrees), or if you haven’t installed the Touchscreen Utilities, you can still use Okular to display sheet music. Here’s how:
-
Open your edited PDF document with Okular and make the “Touch navigation” and “Trim View” adjustments described above.
-
From the View menu, select “Orientation” > “Rotate Right” to rotate the view of your document by 90 degrees. (Only the document will rotate to portrait orientation. Everything else in the Okular window and the rest of the screen will remain in the landscape orientation.)
-
From the View menu select “Presentation”. Open your laptop until it is flat, or as close to flat as possible. Turn it on its side and place it on your music stand with the screen in portrait orientation so the sheet music appears right side up. (Tip: You can use a chip-clip or Velcro to secure your laptop to your music stand.)
-
When using this method, navigating the document is slightly different than described above. To advance to the next page, tap the top of the screen. To return to the previous page, tap the bottom of the screen. As before, tapping a blue link takes you directly to the target page for that link. To exit Presentation mode, slide your finger over to and past the left edge of the screen. This will trigger the Helper Bar to appear, although it will be on its side. Tap the “Exit Presentation Mode” icon at the top end of the Helper Bar.
"Where words fail, music speaks." — Hans Christian Andersen