Apparently a lot of people are having trouble connecting to VPN on UbuntuMate 15.04 and UFW (Uncomplicated Firewall). I could not see a tutorial addressing this issue in the community so I thought i'd create one hopefully it would come useful to someone somewhere, esp to Ubuntu (MATE) converts.
Generally it is good practice to couple VPN + UFW put in the mix a good configuration, you are set to go. Use the below as a rough guide to get started.
Note: The procedure will block all traffic but traffic going through tun0 (VPN Tunnel Virtual Interface), if VPN drops your device will not have internet access which is effectively the purpose of this set up to prevent leaks. Should this not fit your privacy requirement then use Gufw default settings Deny incoming allow outgoing and that is that.
This tutorial assumes you have:
- Sudo (root) access from Terminal.
- Disabled IPv6 – Massive MAC address snooping tool (if not, see below how to achieve that)
- VPN service subscription.
- Installed OpenVPN Client 2.3.2 or VPN provider's Gui (usually based on OpenVPN)
Disable IPv6
Copy and paste all four lines below into a terminal and hit Enter
echo "#disable ipv6" | sudo tee -a /etc/sysctl.conf
echo "net.ipv6.conf.all.disable_ipv6 = 1" | sudo tee -a /etc/sysctl.conf
echo "net.ipv6.conf.default.disable_ipv6 = 1" | sudo tee -a /etc/sysctl.conf
echo "net.ipv6.conf.lo.disable_ipv6 = 1" | sudo tee -a /etc/sysctl.conf
After making these changes, refresh the file by running:
sudo sysctl -p
To verify IPv6 is actually disabled, run ifconfig and verify that "inet6" is not present in the output:
ifconfig | grep inet6
Network Manager Check (Optional)
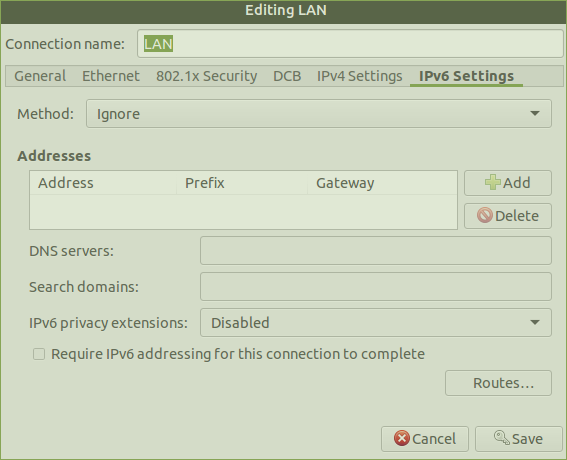
Ensure IPv6 is ignored by NM on both interfaces (eth0 and wlan0) by right clicking on ![]() edit connections > select appropriate inteface > edit > IPv6 Settings > Method : Ignore > save.
edit connections > select appropriate inteface > edit > IPv6 Settings > Method : Ignore > save.

Enable & Configure UFW Rules
sudo ufw status
sudo ufw enable
sudo ufw default deny incoming
sudo ufw default deny outgoing
sudo ufw allow out on tun0
sudo ufw allow out on eth0 to 192.168.1.0/24 (Only needed in Home / Office Mode this will allow traffic to the router/internal network which in this case is located on 192.168.1.0/24. If your computer has multiple network interfaces you can add the interface which you want to use  i.e sudo ufw allow out on wlan0 to 192.168.1.0/24 **edit your internal network subnet accordingly**)
Allow connection to your VPN sever (s)and relevant port number (s)
sudo ufw allow out to **vpn serv ip** **port number** proto tcp or udp
Set UFW rule to enable routing all traffic from your computer / laptop through the OpenVPN server.
Using your favourite text editor (Gedit, Pluma, etc) complete the following steps:
Forwarding Policy
Open Terminal and run:
sudo pluma /etc/sysctl.conf
Enable packet forwarding
net.ipv4.ip_forward=1
UFW Default Config File
sudo pluma /etc/default/ufw
DEFAULT_FORWARD_POLICY="ACCEPT"
UFW Before Rules
sudo pluma /etc/ufw/before.rules
Change /etc/ufw/before.rules to add the following code after the header and before the “*filter” line``
     # START OPENVPN RULES
     # NAT table rules
     *nat
     :POSTROUTING ACCEPT [0:0]
     # Allow traffic from OpenVPN client to eth0 and Wlan0
     -A POSTROUTING -s 10.8.0.0/8 -o eth0 -j MASQUERADE
     -A POSTROUTING -s 10.8.0.0/8 -o wlan0 -j MASQUERADE
     COMMIT
     # END OPENVPN RULES
Registering the above changes in UFW
sudo ufw disable && sudo ufw enable
Review UFW Rules
sudo ufw status verbose
image used for illustration only
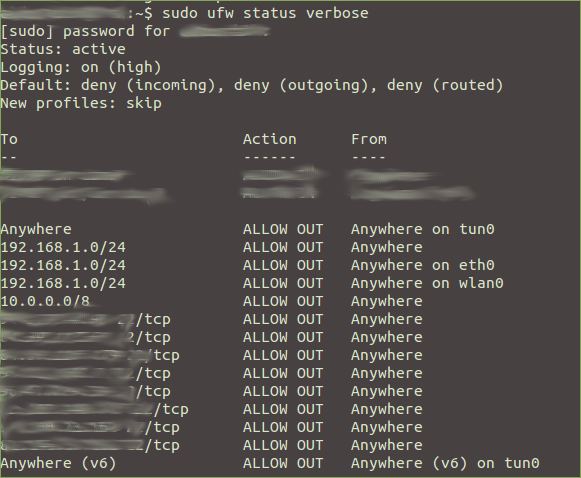
Reboot and run the above command again. If all the above went well, your machine should not be able to connect to the internet however it should be able to connect to your internal network.
Next, connect to your VPN provider:
Run OpenVPN from Terminal
sudo openvpn /home/path/to/your/file/xyzVPN_Someserver_Somewhere.conf (**Ubuntu does not like .ovpn extensions**)
Run OpenVPN through your provider's GUI
Instructions for Linux Ubuntu should be on their website.
Once successfully connected to VPN, check your IP and DNS are not leaked to the whole wide world
DNS Leak
IP Leak
IPv6 Test
If you are using Chrome i would recommend ScriptSafe to protect against WebRTC Leaks.
If you are using Firefox:
Type about:config” in the address bar. Scroll down to “media.peerconnection.enabled”, double click to set it to false.
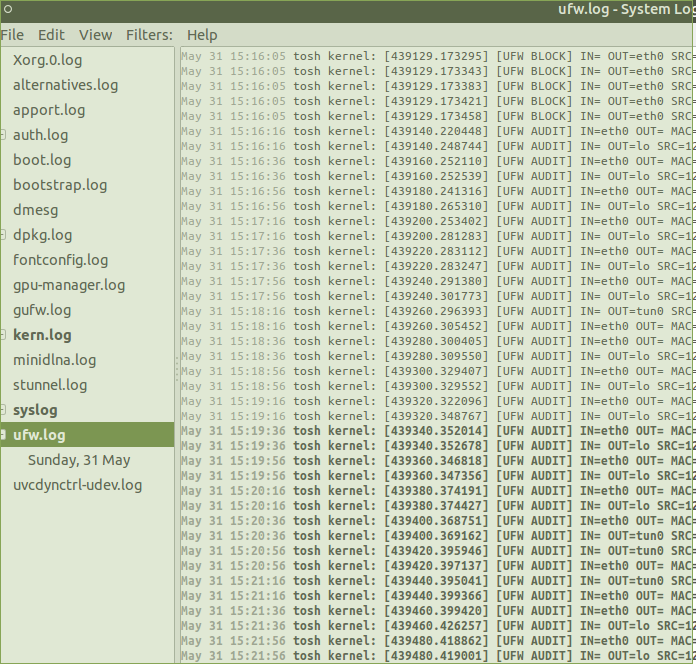
If you want to monitor firewall activity , you can do so by clicking Applications > System Tools> Log File Viewer, this is an extremely handy tool esp when you run into system, application or network connectivity issues
Finally, constructive feedback is much welcome. The intention here is to help hence this guide may work for you but not for others. Suggestions to improve the usability, the content or even corrections of anything in this guide are welcome too
Hope this helps and apologies for the lengthy article.
