I currently have a dual boot system with UbuntuMate 16.04 on SDA (220GB) and Ubuntu 12.04 on SDD (110GB). In preparation of installing 18.04, I want to copy my 16.04 installation over to SDD and have it bootable. I have shrunk the partition on SDA so the boot and swap will easily fit on the 110GB drive. Now I am kind of lost how to proceed. Googling I see various methods using Gparted and Clonezilla, each coming with difficulties with partition tables and Grub. I am assuming if I mess up SDD my system should remain bootable since I am not messing with my primary boot disk SDA. Is this true. Also, any recommendations how to proceed are appreciated.
You can use tools like gparted or clonezilla to copy full partitions but to find the simplest and safest method we need to understand your situation more completely, because these days things are a bit more complicated than a few years back.
Disks can use either GPT or MBR type partitioning, and systems can boot with either Legacy BIOS or UEFI (with or without secure boot), and this can increase the complexity of the backup and restore process.
When you say “dual boot” are you just referring to ONLY Ubuntu 12.04 and MATE 16.04, or do you also have Windows loaded onto a partition somewhere?
If you are only talking about an Ubuntu dual boot system, is it your intention to wipe-out the Ubuntu 12.04 install completely and overwrite it with a copy of your current 16.04, so you can shift from a 12.04 / 16.04 to a 16.04 / 18.04 dual boot?
You mention that you shrank your partitions so “boot and swap” would fit on the 110 Gig drive - Did you mean ROOT / and swap? (because if Linux is installed with only two partitions, they are normally / and swap - with / refered to as “root” (which is confusing as hell, because it has nothing to do with the “root” found in your main / folder.
If you shrank your full drive 16.04 installation down so all the partitions including swap now fall within the first 110Gb of the 220GB drive, and if it’s a simple MBR type partitioning setup – and if your intention is to totally OVERWRITE the existing 12.04 install – then you can literally just copy the full drive image over from the terminal using a single “dd” command.
Copying the full drive image (including the boot sectors) should avoid boot-ability issues, by preserving your current 16.04 boot sector mapping.
If you try to move or rearranging partitions on a single drive, things can get sticky, because you can get stuck with a non-bootable system which has to be recovered by booting from a USB or DVD live-session, manually mounting your moved partition, then manually CHROOT’ing to the temporary / mount point and running sudo update-grub to fix your boot. If this sounds like a royal pain - trust me IT IS … which is why it’s better if possible to dodge the potential broken-boot issue by copying the full drive image if possible.
In your case though, since you are planning to install 18.04, things should work either way, because even if you do get hit with a temporary boot issue on your original 16.04 install, then it should recover automatically when the newly installed 18.04 MATE system runs update-grub as part of the installation process and hopefully auto-detects your moved 16.04 MATE installation.
Copying the full image is still a better idea in my book though, because it preserves a full backup boot sector and GRUB install on your second drive, so that if your main 18.04 disk fails - or becomes so corrupted that it won’t boot - then you can simply switch boot devices in your BIOS and boot from the second drive (which is not possible if the second drive is not bootable on its own).
Thanks for the detailed reply and willingness to help. I will try to answer your questions.
By dual boot I mean both OSs are UbuntuMate. 16.04 on both, then 18.04 on SDA later. Apparently I have MBR on both drives. In searching I see I have a damaged GPT on SDD.
$ sudo gdisk -l /dev/sda | grep -A4 '^Partition table scan:'
Partition table scan:
  MBR: MBR only
  BSD: not present
  APM: not present
  GPT: not present
$ sudo gdisk -l /dev/sdd | grep -A4 '^Partition table scan:'
Warning! Main and backup partition tables differ! Use the 'c' and 'e' options
on the recovery & transformation menu to examine the two tables.

Warning! One or more CRCs don't match. You should repair the disk!

Partition table scan:
  MBR: protective
  BSD: not present
  APM: not present
  GPT: damaged
$
I assume the GPT was damaged when I was experimenting with various imaging back up programs over a year ago and one of them damaged my boot sector. I ended up running boot-repair to make my system bootable again. I don’t believe I am using secure boot and don’t know if it is available?
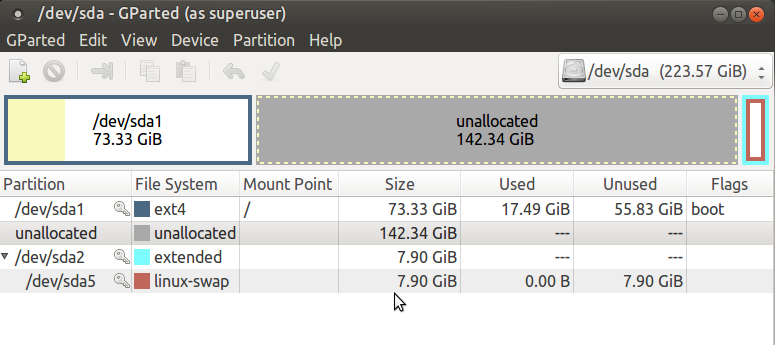
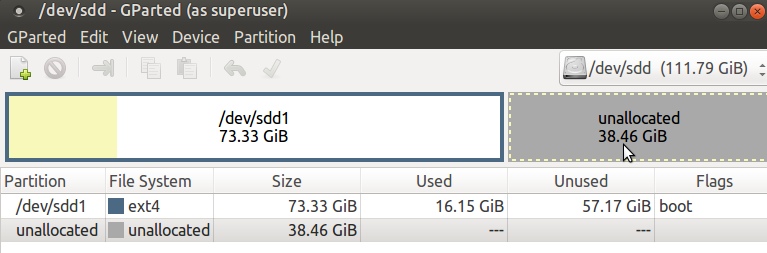
My intention is to wipe-out the Ubuntu 12.04 install completely and overwrite it with my current 16.04, so I can shift from a 12.04 / 16.04 to a 16.04 / 18.04 dual boot? Maybe I am using the wrong terminology when I say boot partition. I am referring to my main partition. See SDA & SDD images below:
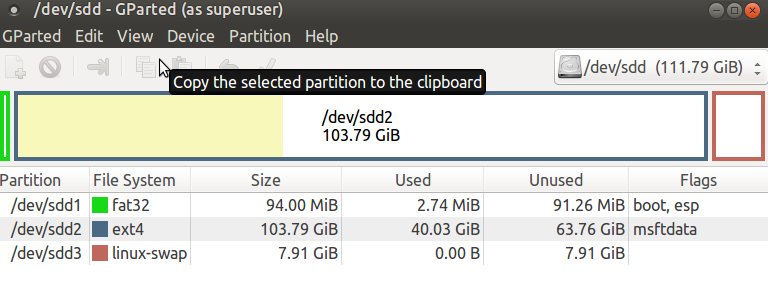
The fat32 partition on SDD was created by boot-repair when fixing the boot issue previously mentioned. Based on your input, it seems copying the full drive image over from the terminal using a single "dd" command is the best approach.
In searching dd commands, I see:
dd if=/dev/sda of=/dev/sdd
But, isn’t this for two drives the same size? What happens to the MBR? Do I need to wipe the MBR and partition tables on SDD before copying?
I appreciate your help.
Let me confirm a few things, since copying with the dd tool can be dangerous, since dd assumes you know exactly what you are doing and will overwrite without warning.
From the /dev/sda gparted screen capture you posted, it does indeed look like you have successfully down sized the main linux / ROOT partition on your 220GB drive.
I assume that this down-sized 73.33 GB partition on the /dev/sda 220GB drive is currently booting your MATE 16.04 WITHOUT ANY PROBLEMS AND SEEMS TO BE HEALTHY?
If this is true, then you can move this healthy 73.33 GB MBR partition based 16.04 install very easily.
The only minor issue you will have to deal with is that the swap partition does not directly follow the main partition. This will have to be handled separately, since you will want to create a new swap at the end of your 110 GB drive.
Since swap is normally optional, the simplest thing to do is to simply boot your MATE 16.04 setup, open a terminal, and temporarily DISABLE SWAP during the move with the following:
sudo swapoff -a
wait till that command completes, then edit your /etc/fstab
sudo pluma /etc/fstab
... to temporarily disable swap on reboot by placing a # hashtag character in front of the swap entry
#UUID=be4822ba-faf1-44cc-d4a3-d98bddad31ad none swap sw
... of course your swap UUID=xxxxxx-xxxxxxx will be different (that's the point of UUID is that they are UNIQUE)
Once you have this done, you should be able to re-boot 16.04 and verify that it is now running without swap by executing:
swapon -s
...which will just return without listing anything, telling you there are no active swap entries.
Then you can delete the current swap partition with gparted, and your /dev/sda 220GB drive will be ready to copy with dd - BUT YOU WILL NEED TO DO THIS FROM A USB or DVD "LIVE SESSION".
The reason for this is simple, just like in Windows, in Linux it's generally a really bad, bad idea to try to copy your operating system while it's running due to the risk of file corruption if a file is copied while it's being updated by the O.S. (like log files, which are constantly being updated).
But since you are planing to upgrade to 18.04 anyway, this is no problem at all, since you will need to have the installer ready on USB or DVD anyway, so just boot up the "Try MATE first" live session and you are good to go to copy over your partition with a simple dd command from the terminal:
sudo dd if=/dev/sdX of=/dev/sdY bs=1M count=80000 status=progress
With /dev/sdX and /dev/sdY replaced by the actual devices - which brings up another very, Very, VERY important warning here -- and I can't over-emphasize this enough...
WARNING - dd will DESTROY data if you aren't super careful to insure that the input file if=/dev/sdX and output file of=/dev/sdY settings are correct - AND THESE DEVICE IDENTIFIERS FREQUENTLY CHANGE WHEN BOOTING FROM A 'LIVE SESSION'.
The easiest way to double check the current /dev device mapping during a live session is with the /preferences/hardware/disks utility from the menu, or by simply typing:
sudo fdisk -l
... in a terminal window
Once you are absolutely sure of the /dev mapping for your 18.04 live session, the above dd command line can be edited to include the correct if=/dev/sdX and of=/dev/sdY entries - then it will copy the first 80 megabytes of data from your 220GB MATE 16.04 drive (enough to include the full working boot loader, partition table, OS partition, plus a little margin) onto your 110GB drive.
You can then test the copied 16.04 installation by using your PC BIOS to over-ride the boot drive to boot from the 110GB drive.
Let me know if you have any other questions, or need help about how to re-create swap once you get everything copied successfully.
Thanks for the detailed instructions. I will attempt later this weekend. One question, in my readings I see many people having issues with MBRs and partition tables when swapping drives. Does the dd command take care of it?
No dd doesn't do everything, which is why I suggested disabling and deleting the swap partition that lies at the upper end of your 220GB drive.
MBR partitions have a fairly simple minded layout which records the starting LBA sector number for each partition, so you don't want to copy a partition table with an entry in it for a swap partition that lies ABOVE 110GB to your smaller HD because that would create an invalid partition table.
... but so long as all the entries fall within the 110GB drives range of valid LBA sector numbers, then the partition table should be fine, as will the linux GRUB boot loader links which locate the kernel images that is supposed to load.
When we use dd to copy things over block by block, sector by sector, making a copy that is identical within the range of sectors that are referred to in the now-smaller partition table, then none of these critical sector offset relationships will change - SO EVERYTHING SHOULD BE FINE.
So, actually, in this case it's NOT what dd is doing, it's what it's NOT doing that insures that everything should work.
What dd is NOT doing is NOT changing ANYTHING in the partition table, or the byte offset relationship between that table and the later data partition, which insures that everything should work the same as it does on the original 220GB drive.
In regard to cleaning up the current GPT errors you are seeing on /dev/sdd
With the newer style GPT partitions you can't get away with the same tricks as I did above without minor issues arising, because if you truncate a group of partitions like this on a GPT drive and copy them to another drive, then you will get the dreaded "Main and backup partition tables differ", because unlike drives with simple MBR partition tables, drives with GPT partitioning have a BACKUP partition table at the end of the hard drive.
Because this backup partition table is at the END of the drive, If you shrink partitions and do the kind of partial dd copy I described above, this backup table doesn't get copied -- not a major problem though, because you can fix this from either the command line or using Gparted, which can be used to copy the still good FIRST copy of the GPT partition table at the beginning of the hard drive, and use it to rewrite the missing SECOND copy of the GPT partition table at the end of the drive.
The reason I did not mention this in regard to the copy operation above is because your corrupted second GPT table is on your Ubuntu 12.04, which will be overwriten with the good 16.04 MBR table from the first drive when we do the byte by byte copy with dd.
So, no need to fix this, because when you completly overwrite your 12.04 with 16.04, you will replace the problem GPT with a currently GOOD MBR. MBR partitions don't have (or need) a second copy of the partition table at the end of the drive, so unlike your current 12.04 GPT setup, the 16.04 110GB copy - SHOULD BE FINE AFTER THE DD COPY OPERATION.
If there are still any minor errors, they will get cleaned up automatically when you boot up your new 16.04 MATE copy and use Gparted to create a new swap partition.
If desired, at the same time that you fix the swap, you could (if desired) also re-resize the first / ROOT partition back to nearly full size if desired (holding back just enough space to recreate your 8 GB swap partition).
Fixing swap is pretty easy, just 3 quick steps
- Use Gparted to create a new swap partition
- Reboot and use the 'blkid' command to find the UUID for your NEW swap partition
- Use sudo pluma /etc/fstab to edit your fstab and remove the # you added to disable swap
and cut and paste in the new UUID retrieved with blkid above in place of the old UUID.
When you reboot, MATE should recognize the new swap partition, which can be checked with:
swapon -s
If the swap is not recognized, then you may need to manually run mkswap
sudo mkswap /dev/sdZn
... where Zn is your new swap partition (hopefully you won't have to mess with mkswap, since the graphical Gparted program should do this automatically after your create a new partition which is set to type "Linux Swap".
2 Likes
I was successful copying SDA to SDD. Everything looks as expected from Gparted. I still can boot to SDA, The GRUB still shows 12.04 on SDD2, so no booting options there. I tried booting to SDD from my bios and all that did was return me to the Grub menu. Now before the dd copy command, my bios showed a SDD and a separate entry for Ubuntu 12.04. I could boot by selecting 12.04, but if I selected SDD I was returned to the Grub menu just like it does now.
So it seems to me I need to repair the Grub. Can this be done being logged in or do I need to do this from a live disk. I would like both disks to be bootable before I install 18.04. I see instruction here. But that is for a single disk boot.
An update: I am not able to mount SDD. Also, although I can mount all other drives, looking at my computer under places, I see this.
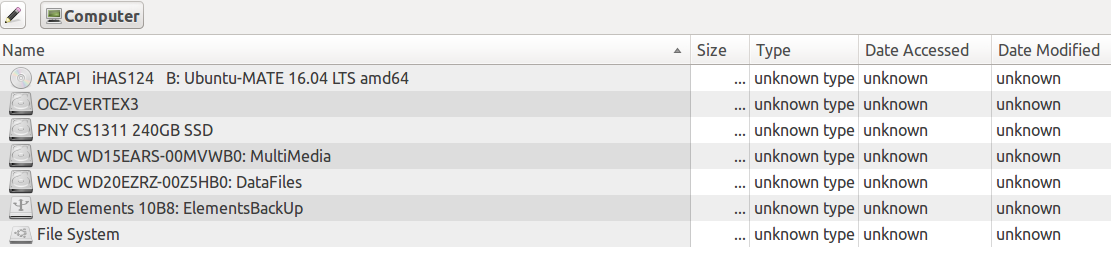
The OCZ-VERTEX3 is my SDD.
I also noticed both SDA and SDD have the same UUID. Should I have saved the previous UUID from SSD? Or can I apply a new random UUID and random PARTUUID?
$ blkid
/dev/sda1: UUID="fa83ad0f-b87c-4640-82a8-786f18f91ba5" TYPE="ext4" PARTUUID="2ef6e257-01"
/dev/sr0: UUID="2016-04-20-23-18-37-00" LABEL="Ubuntu-MATE 16.04 LTS amd64" TYPE="iso9660" PTUUID="6d9d647d" PTTYPE="dos"
/dev/sdb: LABEL="DataFiles" UUID="7cdbf0c0-d4df-471e-a1db-07fbfdb61ef2" TYPE="ext4"
/dev/sdc1: LABEL="MultiMedia" UUID="1986ba60-63d8-49aa-a4c2-47317d18ed79" TYPE="xfs" PARTUUID="000ba044-01"
/dev/sdd1: UUID="fa83ad0f-b87c-4640-82a8-786f18f91ba5" TYPE="ext4" PARTUUID="2ef6e257-01"
/dev/sde1: LABEL="ElementsBackUp" UUID="46144a6a-c62d-4d8a-acb0-4a689736136a" TYPE="ext4" PARTUUID="4407701c-01"
$Your observation about the UUID's being the same is right on the money, as Linux wants UUID's to be UNIQUE -- so the duplication can indeed keep the backup from mounting from an identical UUID MATE 16.04 installation as you were trying to do
-- that said, you should still be able to reverse the boot order in your BIOS -- in which case the situation should reverse -- which would mean that, after booting from the 110GB drive, you would find that MATE would then refuse to mount the 73GB MATE partition on the 220GB drive.
I did not suggest trying to change the UUID's on the copied 16.04 drive, since this creates other complications, and any conflict will go away later on its own after you verify that your copied 16.04 on your 110GB can boot on it's own correctly, and blow away the original 73GB partition on your 220GB drive, because when you re-partition that drive, and install 18.04 WITH A NEW PARTITION TABLE AND NEW PARTITIONS (which will have NEW UUIDs) it will eliminate the duplicate UUID conflict.
-- does this sound right to you? ( I assumed that you wanted to recover the space on your 220GB drive and re-partition and install 18.04 there -- is that right?).
SO THE FIRST ORDER OF BUSINESS IS TO MAKE SURE THAT YOUR COPIED 16.04 MATE INSTALLATION DID BACKUP CORRECTLY, AND WILL BOOT PROPERLY FROM THE 110GB DRIVE.
As I noted above, the duplicate UUID's should not keep you from reversing the boot order in your BIOS and booting from the 110GB drive (which should now have an identical GRUB boot sector, partition table, and first 73GB partition) -- but just in case your BIOS or MATE is still getting confused in some way, have you tried temporarily completely disabling your 220GB drive in the BIOS so that Linux will think that it has a single 110GB drive which is sda?
If you can't get the 73GB MATE partition on the 110GB drive to boot up properly no matter what, even after trying this, then something obviously went wrong with the copy operation, so here are a few simple questions:
What was the actual dd copy command that you used? -- Most importantly, did you copy the full base device to base device i.e. sda, to sdb, sdc, sdd, etc. -- or did you only copy partitions i.e sda1, sdb1, sdc1, etc????
To preserve the boot sector in the copy we need to copy base device to base device (sda, sdb, sdc, sdd), with the upper bound of the dd copy set high enough to guarantee that we get EVERYTHING in your current MATE 16.04 (when calculating the minimum upper bound don't forget the difference between GB = 1,000,000,000 vs GB=1024x1024x1024).
Also, although I mentioned that you should copy using a live session, one thing I assumed, but should probably have stated explicitly, was to also make sure that whatever devices your 220GB and 110GB drives are mapped to (sda, sdb, etc) are all UNMOUNTED in your LIVE SESSION while you are doing the copy (you can check this with the mount command from a terminal, or more easily by using the "disks" GUI application from the preferences/hardware/disks menu.)
This ability to have everything UNMOUNTED is the whole reason we use a LIVE SESSION in the first place.
Sorry, should have noted this, but I have done this so many times, it's tricky to remember all the little details that snag you up first time through.
EDIT:
If you get everything sorted out, so your 16.04 is booting correctly from the 110GB drive, you can eliminate the unneeded Ubuntu 12.04 entry in the 16.04 GRUB boot menu by running:
sudo update-grub
When you install 18.04, it will install it's own new copy of GRUB on the 220GB drive boot sector, and as part of that process, it should automatically detect your 16.04 MATE install on the 110GB drive.
This should happen even if you don't bother to sort out the GRUB bootloader issues on 110GB 16.04 MATE installation, but getting all the boot issues sorted out for the copied 16.04 MATE installation is still worthwhile though, since it will give confidence that the copy operation was completed without errors, and will allow the 110GB drive to boot on it's own at some future date, if your 220GB drive has a failure.
Personally, when I backup or restore a disk image from a backup file, I like to work in "paranoia mode" where I double-check and byte-by-byte verify EVERYTHING.
This is simple 3 step process, but is a bit more time consuming (quite a bit more time consuming for large backups) but does give you a 'warm fuzzy' feeling of confidence that you have a solid clean copy, so you don't have to worry about blowing away the original.
To have any chance of the MD5 check below verifying correctly you MUST boot from a live session and be very careful to make sure that the source and destination disk partitions are UNMOUNTED, and STAY UNMOUNTED while you complete ALL backup and verification steps (do the full copy and verification before you try to re-mount or re-boot either the original or copy disk image).
Here are the 3 simple steps to copy and verify a disk image in "paranoia mode":
1) First we boot into a live session and make sure that no partitions are mounted on either our source or destination drive - and then do a MD5 crypto-hash of the original:
sudo dd if=/dev/sdX bs=1M count=80000 status=progress | md5sum -b
... with sdX being replaced by our actual source drives device (sda, sdb, sdc, sdd, etc)
2) Leave this terminal window open as a reference, open another terminal window on the live session desktop, and do the actual copy operation:
sudo dd if=/dev/sdX of=/dev/sdY bs=1M count=80000 status=progress
... with sdX being replaced by our actual source drive device (sda, sdb, sdc, sdd, etc)
... and sdY being replaced by our actual destination drive device (sda, sdb, sdc, sdd, etc)
3) Now we can then verify that our copy is byte-for-byte identical by checking the MD5 of the copied region on the destination drive with:
sudo dd if=/dev/sdY bs=1M count=80000 status=progress | md5sum -b
... where /dev/sdY is our destination drive (note that this is the exact same syntax as the first command above, but with the drive replaced with the destination so we are checking the MD5 hash of the copy)
If the MD5 sums match, we can assume that the disk image we just copied is byte for byte identical to the original.
Then you can of course also double check by disabling the original drive, and booting from the copy, but note that you should only do this after you do the MD5 check to verify the copy, since the very act of booting a drive changes the MD5 signature. This is because, there will always be small changes to the drive on every boot cycle (like log file updates) so the MD5 will always change.
So here is where I am and how I got there.
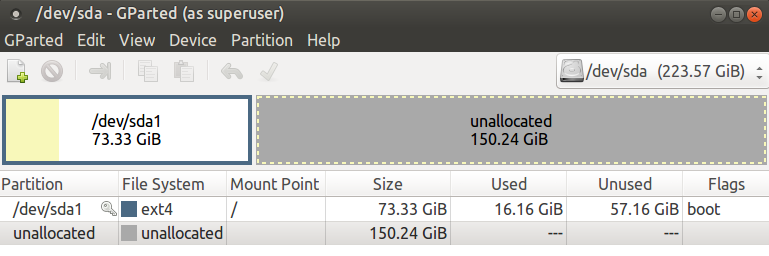
As mentioned earlier everything appeared to copy over properly. When I selected sdd to boot in my bios the Grub menu loaded. The Grub only provides option for 16.04 on sda and 12.04 on sdd2. Against your advise I did try changing the UUID. This did make the drive mountable, but again no luck booting. Keep in mind, I have never been able to boot directly by manually choosing sdd. My bios showed sdd, but also had a “Ubuntu 12.04” (which was in sdd2) listed which did boot when manually selected. So I don’t see how to force a boot without the Grub. I also noticed the GPT error still existed on sdd. So I “sudo gdisk /dev/sdd” and removed both the GPT (since sda did not have a GPT) and MBR, then added a partition. Boot to live disk and copied SDA to SDD again “sudo dd if=/dev/sda of=/dev/sdd bs=1M count=80000 status=progress”. Yes, I did verify prior the drives identification and did a md5sum check which came out exact. The corrupt GPT is now gone and the two drives look identical. See below:
$ sudo gdisk -l /dev/sda | grep -A4 '^Partition table scan:'
Partition table scan:
  MBR: MBR only
  BSD: not present
  APM: not present
  GPT: not present
$ sudo gdisk -l /dev/sdd | grep -A4 '^Partition table scan:'
Partition table scan:
  MBR: MBR only
  BSD: not present
  APM: not present
  GPT: not present
Now I did verify the two drives have the same UUID using Gparted. What is odd now is “blkid” returns nothing.
$ blkid
$
So where I was hoping to go was to have a Grub supporting the booting of both drives with 16.04. But based on your input above I understand that maybe more difficult than just installing 18 on sda and let the installation fix the rest. I have not tried running boot-repair which I see they have a live-disk on sourceforge.
Just curious if you have any other recommendations before I try boot-repir first then 18.06 installation? Just a reminder, I have image backups of all drives although I do not know if 12.04 is restoreable since I deleted GPT on sdd, but 12.04 is really no longer needed. Thanks again for you patience and help. I have learned a lot.
if the MD5 was ok, I don’t see any reason that both drives should not be bootable since they are now effectively identical – which, by the way, means that the UUIDs are once again identical, unless you somehow broke the UUID on your original 220GB source drive – in which case they would now BOTH be broken.
So, this would be a good time to enable the drives one as a time if possible, and check to see if you can still boot at all from either drive.
While you are doing this, I hope you understand that when you boot GRUB from the 110GB drive, you should NOT expect to be able to boot it as “sdd” using some newly found GRUB entry, or by using the old 12.04 entry - because after your BIOS reverses the BOOT order, GRUB (and the subsequently booted MATE 16.04) will think they are booting sda not sdd. — So if you do succeed in booting up 16.04 from your main GRUB menu on the 110GB drive as “sda” it should boot as “sda” and think the 110GB drive is now “sda” .
At least that’s how it has always worked for me… (although, as I mentioned, you might have to temporarily disable the 220GB drive in you BIOS to avoid the system becoming confused due to the duplicate UUIDs)
Be careful at this point, because with the duplicate UUID, and confusion about which drive is really booting as sda, it would be pretty easy to corrupt your working 16.04 on the 220GB drive, before you insure that the 110GB drive is bootable.
At this point, the safest way to proceed is to use the BIOS to temporarily disable the 110 GB drive, make sure that the 220GB drive can still boot, and then reverse the process, and disable the 220GB drive and check to see if you can boot from the 110GB drive.
If you can’t do it in your bios, there is a way to do it manually, but it’s a little dangerous so it would be better is there is a simple BIOS setting that you can use.
It is technically possible to preserve both 16.04 installations, but you would have to change the UUIDs of one of them (both the disk UUID and the partition UUID).
I am fairly certain that other measures like Boot repair will not be able to fix things unless you change the disk and partition UUIDs of a least one disk.
After that, Ubuntu will not boot on that partition where you changed the UUIDs till you edit the /etc/fstab on that partition (the one where you changed the UUID's) so that Ubuntu knows how to mount the root partition ( look at the /etc/fstab and you will see that the partition UUID appears in the line that mounts / )
You mentioned that 16.04 would not boot on the partition where you changed the UUID, and this is most like why that happened - because Ubuntu uses the UUID to mount the partition, rather than the /dev/sda1 device ID.
If you change the UUID of one of the drives and partitions, and edit the fstab on that partition to update it to the new UUID for the root partition, then everything should work.
Then you would be free to install 18.04 in the free space on either drive, and everything should work.
Sorry if this seems like a royal pain, but this is what I was referring to when I said that things would be fairly simple if the only goal was to move 16.04 from drive to drive, but would be "more complex" if you need to preserve BOTH partitions.
There is probably a way, but I do not see how to disable a drive in the bios. The only way I know how to disable a drive is to physically disconnect it. I can try that later when I have time to relocate PC to a better location for that type of work.
For some reason, the blkid command is working again. I did confirm both UUID and PARTUUID are still identical. In the mean time I will think more about changing the UUID & PARTUUID and updating fstab. None of those tasks seem difficult.
If you can select boot devices in the BIOS, but not disable devices, there is a simple way to do it in software, but like the backup operation itself, you have to be VERY careful about what you are doing.
The procedure is straightforward 2 step process.
-
back up your boot sector (first 512 bytes of the drive)
-
write zeros over the boot sector to 'disable' the drive.
Later when you want to 're-enable' the drive you just restore the boot sector.
Theoretically you already have one backup, created when you copied sda to sdd
|
You can easily check that the boot sectors on these drives are still identical with:
sudo dd if=/dev/sda bs=512 count=1 | md5sum -b
sudo dd if=/dev/sdd bs=512 count=1 | md5sum -b
Note: these commands only read the first 512 bytes from each partition, so they should complete within seconds (as soon as the drive spins up) - and because we are only reading (and not writing) data from the drive, these commands should be completely harmless (although, as always, you should be extremely cautious when evoking ANY dd command on a hard drive, since seemingly minor typo's can sometimes have disastrous consequences).
If they are identical, then you already have ONE backup, but just to be safe you can easily create a second backup by booting into a live session, a nd writing an additional boot sector backup to any writable drive ( other than sda or sdd of course )
To do this simply open a folder on the writable drive where you want to store the backup, and then use the right-click menu to select -> "Open in Terminal" and execute the command:
sudo dd if=/dev/sda of=my-sda-mbr.dat bs=512 count=1
This should create a file named "my-sda-mbr.dat" in the folder where you opened the terminal above.
As a final check, you can verify the files MD5 from the terminal with:
md5sum -b my-sda-mbr.dat
... which should give the same md5sum as you got above when using dd and md5 sum with sda and sdb.
Now that we have multiple backups for the MBR sector of sda and sdd, we can temporarily disable either drive by simply using dd to write ZEROs over the MBR.
For example to disable sda so we can verify positively the the system can boot from sdd we would use:
sudo dd if=/dev/zero of=/dev/sda bs=512 count=1
This will temporarily disable sda and make it look like an un-partitioned drive.
If you then set your BIOS to boot from the 110G drive, then it should boot up thinking that drive is sda, and that your 220G drive is un-partitioned drive.
The purpose of this exercise is that it will let you positively verify that the 110G drive does boot and run Linux normally.
When you are confident that the 110G drive is working well, you have the option of either leaving the 220 drive un-partitioned and just running the MATE 18.04 install, or if you want to try to fix the UUID's and preserve 2 copies of 16.04, then you can restore the boot sector on the 220G drive.
To do this you can use dd to restore the MBR from the backup file by changing to the same folder where you copied your backup MBR file my-sda-mbr.dat and executing the command:
sudo dd if=my-sda-mbr.dat of=/dev/sdX bs=512 count=1
... where /dev/sdX is the device id for the 220G drive (may be sdd now or some other device, since Linux will likely change your device ordering due to the change to booting from the 110G drive)
This should restore the first 512 bytes of the drive from the backup, restoring the MBR, and then you are free to experiment with changing the partition and drive UUIDs if that's the way you want to proceed.
I finally had some time to come back to this challenge.
History: So I copied sda to sdd. I could not get sdd to boot because of the same uuid. Even if I selected sdd in the bios, system went to the grub only allowing me to select sda drive. Just a reminder, selecting sda did the same thing, brought me to the grub.
So, I changed ssd’s UUID, PARTUUID, fstab, and grub to show new UUID. Although the drive was now mountable I still could not boot it. So I finally opened the PC and disconnect sda. No luck booting but I did get the grub terminal. At this point I started over and re-copied sda to sdd.
Update: I copied sda to sdd. Shut down PC, disconnected sda. System boots just like before using the grub.
Questions: My understanding now is I should be able to install 18.04 to sda and the installation process will fix the UUID/PARTUUID conflict and fix the grub so that I can boot to 18.04 on sda and 16.04 on sdd. Is this a correct understanding?
Also, as mentioned in the 4th post, the sdd apparently had a damaged gpt when 12.04 was installed. I don’t understand why it is damaged again, as I did fix it earlier when I made sdd mountable. The damage returned after my recent copying sda to sdd. The system does boot with this damage. Do you recommend attempting to fix prior to 18.04 install?
Sorry you encountered boot issues trying to get both 16.04's to run at the same time, but so long as you are satisfied that the 110GB drive is booting and working on it's own, you should be safe to proceed with your 18.04 install.
The only thing that seems out of place is that you are seeing a damaged gpt, as this should not be the case since a simple MBR partition table with up to 4 partitions only occupies the first 512 bytes of the first sector on the HD, so this should have copied over identically, leaving both the larger 220GB and smaller 110GB with identical healthy MBR partitions.
But, as I mentioned before, GPT partitions have a backup table at the end of the drive, and since you previously had the 110GB drive partitioned as GPT, and since the copy operation only copied the first 80GB from sda to sdd, it's likely that Gparted may still be seeing that left over backup GPT partition table at the end of the smaller 110GB drive, and because this GPT table doesn't agree with the MBR partitioning at the start of the drive, it's shown as a broken GPT.
This has no relevance since the drive is now using the simple old style MBR partition table at the beginning of the drive. You could clear out this extra unneeded GPT entry at the end of the drive manually by writing zeros to the last few megabytes ot the 110GB drive using dd with a "seek=" type parameter, but I wouldn't bother unless the problem persists after you re-create a swap partition for your 16.04 installation on sdd (as I described above in a previous post) using Gparted, because Gparted should correct this type of partition table mismatch errors when it updates the partition table to add the new swap partition.
So far as installing 18.04 goes, to fully avoid the dreaded UUID issue cropping up again, you should zero out the 220GB UUID's by erasing the drive before installing 18.04, which will allow 18.04 to create NEW drive and partition UUIDs as part of the install. To save time, you could just zero the first 512 bytes, as I described previously, but to avoid future issues if the drive should ever become corrupted and you have to try to use recovery tools, I would wipe the whole drive so you are starting with a clean slate.
As I said before, it is VERY important to double check your device mapping in the Live-Session and make sure that the 220GB drive's device is still /dev/sda
Once you are sure of your device mapping, how you should go about erasing the 220GB drive depends on what type of drive you are dealing with.
If it's an old-school spinning platter drive - and assuming that it is indeed still mapped to /dev/sda - you can boot from the Live-Session and write zeros over the full 220GB drive with:
sudo dd if=/dev/zero of=/dev/sda bs=1M
Since we are not specifying an end point or limiting block count, this will ZERO THE FULL DRIVE.
If the 220GB drive is a Solid State Drive (SSD), then a MUCH better alternative is to simply boot from the Live-Session and do a "block discard" operation on the full drive using:
sudo blkdiscard /dev/sda
This will send a command to the SSD that ALL the sectors on the drive are UNUSED, which will effectively ERASE THE FULL DRIVE in only a few seconds.
Aside from the speed advantage, the difference between blkdiscard and just writing zeros to the drive is that blkdiscard tells the drive that the sectors are not used, and this allows the SSD to put them back into the wear leveling pool, which is very important to maintaining SSD speed and reliability.
Either of the above methods (dd'ing zeros or blkdiscard) will give you a pristine unpartitioned 220GB drive to install to, which is the best possible scenario for the 18.04 installer, since then you are free to create any partition arrangement you want (boot / root and home all together, or as separate partitions).
Since I was able to get both to boot (even though I had to physically remove the one drive) I went ahead and installed 18.04 on sda. Installation went fine, it took a couple of boots for the system to fix the grub.Now the first thing I did when logging into 18.04 was in Mate Tweak, which destroyed my panels, so I will start a new thread on that.
BTW…The bad GPT was on the sdd (110GB SSD). Like I said, it is still bootable, that is why I went ahead and installed 18.04 to.
I forgot to add, I had no issue restoring swap file to the 16.04 sdd (110GB) installation.
@Crotchety Thanks again for all your help and instructions. I know it takes patience on your part to help someone at my level. But it is the help like that comes from this forum that make Ubuntu Mate so great. Thanks again for all your help!
The GPT glitch is related to what I was trying to say above, there is just a bogus GPT entry at the end of 110GB drive, which should straighten itself out when you recreate your 16.04 swap partition on sdd.
If everything is booting and mounting ok now under 18.04, you should be able to check to see that all your drives now have unique UUIDs by simply running:
sudo blkid
If so, then hopefully grub is now working correctly and showing your old 16.04 partition on 110GB drive as a valid boot option, and you should now be able to boot up from either 18.04 or your old 16.04 install.
EDIT:
It looks like we had crossing posts...
Glad you got everything worked out.
Everything has a unique UUID, but the GPT glitch is still there. Keep in mind it was there prior to the copy command when 12.04 was still installed. See below:
$ sudo gdisk -l /dev/sdd | grep -A4 '^Partition table scan:'
Caution: invalid main GPT header, but valid backup; regenerating main header
from backup!

Warning! Main partition table CRC mismatch! Loaded backup partition table
instead of main partition table!

Warning! One or more CRCs don't match. You should repair the disk!

Partition table scan:
  MBR: MBR only
  BSD: not present
  APM: not present
  GPT: damaged
Also, I assume there are two grubs, one on sda and one on sdd. Occasionally I get the one on sdd that still shows the 12.04 installation. Just a minor fix I will need to search for.