I had a similar problem and solved it this way:
This solution assumes all relevant drives are fully mounted, you have installed Samba and have assigned the relevant folders to Samba.
A niggling problem for me, with Mate, is that when I logged in I had to actively browse the network on the menu and navigate to my network folders. As soon as I opened one, it then appeared for the rest of the sesssion in my network places list on the menu. However, I wanted all my shared network folders to all be present on the network places menu right from login so that I could just click straight on them without having to navigate to them. I initially tried doing the obvious thing by simply assigning an smb folder address as a book mark. This "worked" to the extent that it then appeared as a bookmark with the correct label for that session. But, when I re-logged in, although it was still there as a bookmark, its label was now only "smb" irrespective of its actual share name. If I clicked it, it opened at the correct samba location and then the correct share label would appear next to its bookmark icon in the places menu. But, only after I had clicked it. For only the one network location, this might suffice. But, I have several and when they are all initially identically labelled "smb" in my bookmarks menu (until they are clicked on) this is not very helpul to say the least.
The following solution has fixed all of the above:
The first thing you need to do is to navigate, each in turn, to your various shared network folders using your file manager. In my case it's Caja. When you do, toggle the location bar and copy the smb address from it. Open up a blank text doument such as Pluma or Gedit.
Then paste your smb addresses, each in turn, on seperate lines below the above
For example, my smb network folder adresses are:
smb://stephen-desktop/photo-album/
smb://stephen-desktop/audio/
smb://stephen-desktop/videos-1/
smb://stephen-desktop/videos-2/
smb://stephen-desktop/videos-3/
After you have done that, prefix each of the address entries with the following:
caja
Thus, the contents of your text file should now look like this (obviously, with your own smb addresses)
caja smb://stephen-desktop/videos-1/
caja smb://stephen-desktop/videos-2/
caja smb://stephen-desktop/videos-3/
caja smb://stephen-desktop/audio/
caja smb://stephen-desktop/photo-album/
Also, if you are not using Caja file manager, you may need to change the "caja" part of the above to whatever you are using. "nemo" or "nautilus", for example.
The next thing you need to do is insert some sleep commands to stop all of the above from executing too quickly. Don't ask me why but I have found that, in this regard, Mate is a bit flakey and if I don't slow the process up slightly it can sometimes miss executing bits of the code. By inserting these sleep commands, I have found that problem never occurs. The code should now look like this:
caja smb://stephen-desktop/videos-1/
sleep 1
caja smb://stephen-desktop/videos-2/
sleep 1
caja smb://stephen-desktop/videos-3/
sleep 1
caja smb://stephen-desktop/audio/
sleep 1
caja smb://stephen-desktop/photo-album/
sleep 1
You now need to past the following code below all of the above:
new_window_id=xprop -root | grep '_NET_ACTIVE_WINDOW(WINDOW)'| cut -d '#' -f 2
old_window_id=""
close_wait=0
while [ $close_wait -le 10 ]
do
if [ "$old_window_id" = "$new_window_id" ]
then
close_wait=$(($close_wait+1))
else
close_wait=0
xwit -id $new_window_id -iconify
fi
old_window_id=$new_window_id
new_window_id=xprop -root | grep '_NET_ACTIVE_WINDOW(WINDOW)'| cut -d '#' -f 2
done
All that the above code is doing is telling Mate to minimize all open windows on the desktop. This part of the script is not really necessary. But I like as it keeps things all nice and tidy while the script is doing its work.
So now, the contents of your text file should look like:
caja smb://stephen-desktop/videos-1/
sleep 1
caja smb://stephen-desktop/videos-2/
sleep 1
caja smb://stephen-desktop/videos-3/
sleep 1
caja smb://stephen-desktop/audio/
sleep 1
caja smb://stephen-desktop/photo-album/
sleep 1
new_window_id=xprop -root | grep '_NET_ACTIVE_WINDOW(WINDOW)'| cut -d '#' -f 2
old_window_id=""
close_wait=0
while [ $close_wait -le 10 ]
do
if [ "$old_window_id" = "$new_window_id" ]
then
close_wait=$(($close_wait+1))
else
close_wait=0
xwit -id $new_window_id -iconify
fi
old_window_id=$new_window_id
new_window_id=xprop -root | grep '_NET_ACTIVE_WINDOW(WINDOW)'| cut -d '#' -f 2
done
Finally, you need to paste the following below everything else:
sleep 1
caja -q
The above is telling Caja to close all file manager windows, be they active or minimized (again, change "caja" to the name of your own file manager if it is different).
So now, your finished code should look like this:
caja smb://stephen-desktop/videos-1/
sleep 1
caja smb://stephen-desktop/videos-2/
sleep 1
caja smb://stephen-desktop/videos-3/
sleep 1
caja smb://stephen-desktop/audio/
sleep 1
caja smb://stephen-desktop/photo-album/
sleep 1
new_window_id=xprop -root | grep '_NET_ACTIVE_WINDOW(WINDOW)'| cut -d '#' -f 2
old_window_id=""
close_wait=0
while [ $close_wait -le 10 ]
do
if [ "$old_window_id" = "$new_window_id" ]
then
close_wait=$(($close_wait+1))
else
close_wait=0
xwit -id $new_window_id -iconify
fi
old_window_id=$new_window_id
new_window_id=xprop -root | grep '_NET_ACTIVE_WINDOW(WINDOW)'| cut -d '#' -f 2
done
sleep 1
caja -q
Save the file as "display-network-share-folders.sh". If you don't actively specify a location to save to, it will save to your home folder. Once you've done that, close the file.
Open up a terminal. It should automatically open in your home folder where your newly created file is stored. Type the following to make the file executable as a bash script:
sudo chmod +x display-network-share-folders.sh
Next you need to install a small program called "xwit". This program is needed by the part of the code in your script that minimises the windows during its execution. Once installed, you never need to use it directly, it will only ever be needed by your script. It takes only a few second to install.
In your already open terminal type:
sudo apt-get install xwit
When installed, close the terminal.
That's it so far as the creation of the script is concerned. You could test it at this point by opening up your file manager and double clicking the file. It will ask if you want to run it in a terminal and you should choose to do so. At which point you will see how it makes all of the relevent network folders appear in your places menu.
Finally, you need to make this script run automatically at login. You do this by adding it to "startup applications". To do this, go to your menu and navigate to system/preferences/startup applications. Click on the “Add” button to add a new startup application. For the Command, press the "browse" button and navigate to your “display-network-share-folders.sh” file and choose it. For the Description, simply write "display shared folders" (or whatever you want) in the box. When you're done, close the “add” dialogue box. You should now see this file listed as one of your start-up applications in the start-up-applications dialogue box. Close the start-up-applications dialogue box.
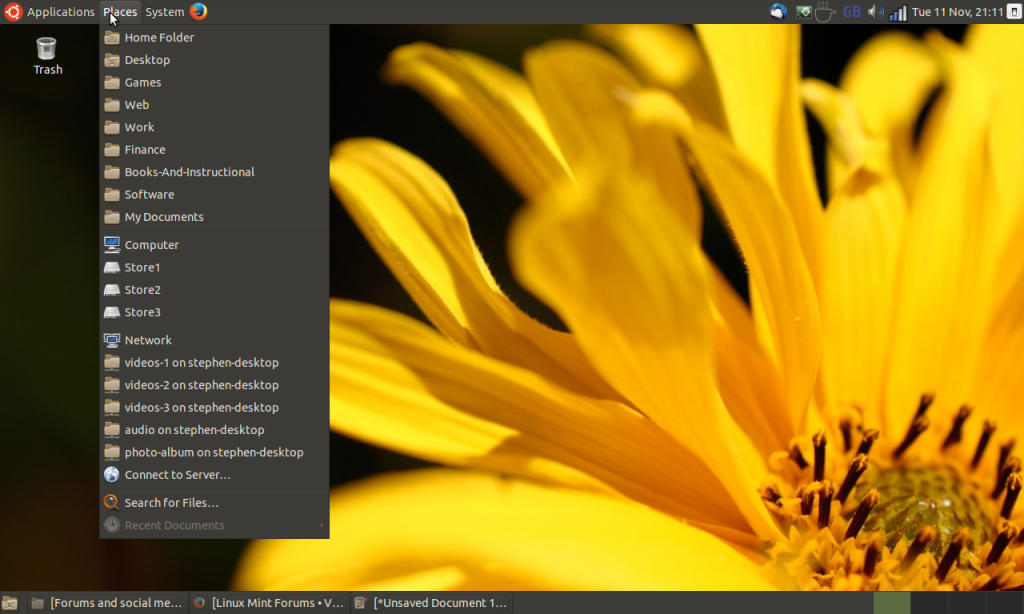
That's it folks. If you log out and then log back in again you wil find that that all of your network folders are now visible at the top level of your network places menu right from the off and so are immediately available to click on.
Please see the link below for a screenshot of my own menu immediately following login with the above solution implemented:
[quote="stevecook172001, post:2, topic:326"]