 Introduction
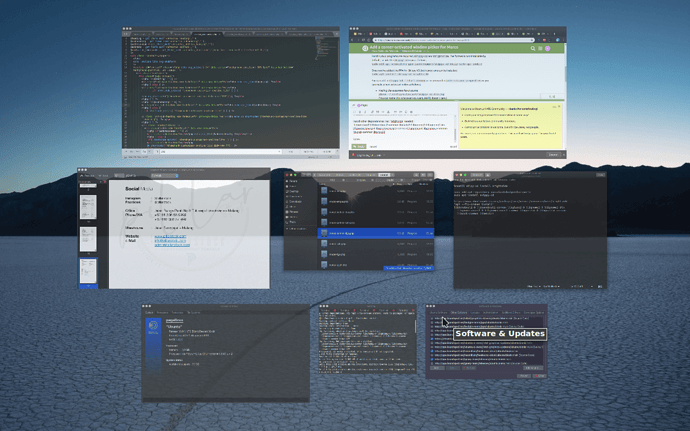
If you dislike Compiz that much, you don't wish to ever use it despite Compiz having hot corners and its own window picker, as well a whole bevy of other useful productivity features, then you'll be pleased to know there is an alternative to that if you wanted just a means of picking windows with previews which is very easy to install, and easy enough to implement.
The title is slightly misleading because two programs are in effect here, but after following this tutorial you'll have a means of assigning a window picker to a hot corner, and they'll work together seamlessly.
 Glossary
Since @ouroumov mentioned a need for it, may as well include this. Images to come at a later date (i.e. when I feel like it);
Window picker: Also Window chooser or Window selector, a software that allows for the selection of windows, with or without window previews.
Hot corner: A corner of your screen dedicated to activate a task on hover.
 Rationale for use
If you don't want to use Compiz but have something similar to Exposè, then below is a possible solution. Some people like a super-clean, super-minimal desktop, and having a means to choose windows easily with large output and image previews may be something that people looking for a minimalist setup may want.
 Skipping around
Special information for Eoan Ermine
You need to download a bunch of files, normally for Brightside to be installable. To avoid giving Rhonda of Ubuntu Packages any more grief, rather than sharing the files directly I will just share this archive which will contain everything you need;
https://github.com/Hebgbs/Hebgbs.github.io/raw/linux/brightside_amd64.tar.gzI am not entirely sure when this began to become an issue, my guess is dependencey problems began after Cosmic. I will test and further append onto this later. At the moment, that archive provides:
brightsidelibbonobo2-0libbonobo2-commonlibbonoboui2-0libbonoboui2-commonlibgnome2-0libgnome2-binlibgnome2-commonlibgnome-2-0libgnome-keyring0libgnome-keyring-commonlibgnomeui-0libgnomeui-commonlibgnomevfs2-0libgnomevfs2-commonliborbit-2-0multiarch-supportExtract the entire contents and install them. Easiest if handled in a separate directory, using
x-terminal-emulator(or a terminal emulator of preference) tocdinto that directory then performsudo apt install *.deband install them all at once.
For this, two programs are required; skippy-xd and brightside. The former is not installable by default, so add the skippy-xd repo as follows;
The Ubuntu Budgie team has the latest version of
skippy-xdand as such, this segment of the guide has been modified with this new information.
In
x-terminal-emulator:sudo add-apt-repository ppa:ubuntubudgie/backports sudo apt update
Once you've added the PPA for Skippy XD, both programs can be installed;
In
x-terminal-emulator:sudo apt install skippy-xd
You will already have installed Brightside using contents of the archive above.
You can add in skippy-xd --start-daemon as a command in mate-session-properties or you can make a new autostart entry as follows;
In your preferred text editor @
~/.config/autostart/skippy-xd.desktopType=Application Exec=skippy-xd --start-daemon Hidden=false X-MATE-Autostart-enabled=true Name[en_US]=Skippy XD Name=Skippy XD Comment[en_US]=Executes the Skippy XD window picker daemon. Comment=Executes the Skippy XD window picker daemon.
When finished, save as skippy-xd.desktop in ~/.config/autostart. You can make this autostart entry appear however you like, but only the command (Exec) is what matters.
 Making it shine
The last part is a GUI bit I can't avoid, so bear with my explanation;
- Open
brightside-properties - Enable any corner you'd like to use
- For that enabled corner, at the dropdown menu select Custom action...
- Upon selecting it, a dialog box will pop up.
On entering region:skippy-xd --activate-window-picker
On leaving region: Terminate above application
To test, run skippy-xd --start-daemon manually and go to the corner you activated to try it out. If all you see is a popup with a generic gears icon but no action, then you did it wrong. If you did it right, then next time you sign in, Skippy XD should run automatically as daemon and wait for you to put your mouse in the corner you specified for it to display the window picker.
 Other information
Skippy XD will position your cursor on the centre of the last window you were at. Bear that in mind; you may become slightly disoriented when first using it.
 Information sources
Thanks @Pegel for the update.
