WARNING 1:
BACKUP ALL YOUR DATA BEFORE YOU START TO INSTALL IN CASE THINGS GO WRONG!. SAVE ALL YOUR IMPORTANT FILES AND FOLDERS TO EITHER AN EXTERNAL USB DRIVE AND/OR TO A 2ND HARD DRIVE ON YOUR PC. DO NOT SAVE ANYTHING ON THE SAME DRIVE YOU INTEND TO USE FOR LINUX UNLESS YOU UNDERSTAND/KNOW WHAT YOU ARE DOING!. ONCE YOU START PARTITIONING AND YOU COMMIT TO FORMATTING YOUR PARTITIONS, THERE IS NO GOING BACK!.
WARNING 2:
IF YOU HAVE A RECOVERY PARTITION AND HAVE NOT CREATED ANY RECOVERY DISKS FOR YOUR PC, STOP READING AND DO THAT FIRST!.
WARNING 3:
WHEN YOU PARTITION, IF YOU FORMAT THE RECOVERY PARTITION OF YOUR PC, YOU WILL NOT BE ABLE TO RECOVER YOUR OPERATING SYSTEM SHOULD THINGS GO WRONG WITH UBUNTU. ONLY FORMAT THE RECOVERY PARTITION IF YOU ARE CERTAIN YOU DON'T WANT IT ANY MORE!.
Once erased, that's it, you will have no more recovery of Windows or Mac on your PC, please bear this in mind!.
Assuming that you are a complete Linux beginner and don't have much of an idea on how to download a ISO file, create an installation media disk/USB stick and install an Ubuntu based system, then this is for you!.
What is an ISO file?:
Well you can read all about that in the following link should you feel the need to do so, basically its a giant file with all the necessary data you need to create a bootable live operating system with which; you can run in an operating system live mode without installing it, when you are finished, just shut the PC down and it will return to its previous state, this is working on the assumption that you are only testing the disk/USB stick and not actually doing a full install!:
What you do need to pay attention to is whether your computer is a 32 or 64 Bit system, if you are unsure, download the 32 Bit version of the ISO file and it will still work well on a modern 64 Bit PC. (I use 32 Bit versions of Linux on both of my 64 Bit PC's no problem!. 32 Bit versions are good for older PC's!).
See the following link for an explanation:
Okay, so where do I get this ISO file from?:
There are several ways to do this but you are advised to download from the main Linux distributors website like Ubuntu and its variants such as Ubuntu Mate, Kubuntu, Lubuntu etc.
Make sure that the ISO you are downloading will actually run on your PC, always check out the “Minimum System Requirements” before deciding which one you want!.
Download from the following locations (Download the LTS version if you want a stable version which will be supported for a long time. LTS = Long Term Support):
Ubuntu Mate (Revamp of Gnome 2 desktop):
(Click on download link for the latest version!).
Ubuntu (Unity):
(Click on download link for the latest version!).
Kubuntu (KDE):
(Click on download link for the latest version!).
Lubuntu (LXDE; 32 & 64 Bit only for older PC's!):
(Click on download link for the latest version!).
Ubuntu Gnome (Gnome 3 desktop, please read the release notes before downloading!):
(Click on download link for the latest version!).
Xubuntu (XFCE desktop):
(Click on download link for the latest version!).
Ubuntu Budgie Remix (Select either the 16.04 or 16.10 links):
And for the tons of Ubuntu variants and other Linux versions, click on the links at:
“Minimum System Requirements”:
Ubuntu Mate:
Minimum:
Pentium III 750-megahertz
512 megabytes (MB) of RAM
8 gigabytes (GB) of available space on the hard disk
Bootable DVD-ROM drive
Keyboard and Mouse (or other pointing device)
Video adapter and monitor with 1024 x 768 or higher resolution
Sound card
Speakers or headphones
Recommended:
Core 2 Duo 1.6-gigahertz
2 gigabytes (GB) RAM
16 gigabytes (GB) of available space on the hard disk
Bootable USB flash drive
Keyboard and Mouse (or other pointing device)
3D capable video adapter and wide screen monitor with 1366 x 768 or higher resolution
Sound card
Speakers or headphones
Ubuntu Desktop Edition
700 MHz processor (about Intel Celeron or better)
512 MiB RAM (system memory)
5 GB of hard-drive space (or USB stick, memory card or external drive but see LiveCD for an alternative approach)
VGA capable of 1024x768 screen resolution
Either a CD/DVD drive or a USB port for the installer media
Internet access is helpful
Ubuntu Server (CLI) Installation
300 MHz x86 processor
192 MiB of system memory (RAM)
1 GB of disk space
Graphics card and monitor capable of 640x480
CD drive
Lightweight GUI alternative (Xubuntu and Lubuntu)
If you have an old or low-spec computer or want to get the most out of your hardware, using a medium-lightweight desktop system such as Xubuntu or a lightweight such as Lubuntu is recommended, as they make more efficient use of your system's resources. Of course, even if you have the newest equipment out, you could still use these two.
If your system has less than 192 MiB of system memory, use the Alternate Installation CD.
Note: If you have a low-specification computer, certain features may be automatically turned off to conserve system resources. For example, if you have a graphics card with only a small amount of video memory (VRAM), the boot-up screen may not be shown.
Follow this link for detailed instructions: Installation/LowMemorySystems.
Minimum system requirements for Xubuntu would fall roughly between Ubuntu Server and Desktop:
512 MiB of system memory (RAM)
5 GB of disk space
Graphics card and monitor capable of 800x600 resolution
With Lubuntu, you can use computers with even less memory.
Ubuntu Budgie Remix:
Minimum Hardware Recommendation
dual core/2 virtual core processors, 2Gb RAM, 16GB HDD
Ubuntu Netbook Edition:
since the release of ubuntu natty (11.04) the netbook version has been unified and is now part of the ubuntu-desktop edition, this has been done via the unity desktop software.
you may now use the standard ubuntu desktop CD image to install on net-books with specifications such as:
Intel Atom processor @ 1.6 GHz
386 MiB of system memory (RAM)
4 GB of disk space
Screen of 1024x600 resolution
Graphics chipset with support for visual effects
Okay, so I've downloaded the ISO file of my preferred version of Ubuntu, now what?.
So now you need to “burn” the ISO file to a disk or create a USB pendrive/stick boot media, BURN THE DISK AT THE SLOWEST POSSIBLE SPEED OR FULLY FORMAT THE USB STICK TO FAT32!.
All is explained here on how to burn an ISO file to disk:
For USB, please refer to this guide on how to use “Unetbootin”:
(People with UEFI/Secure Boot systems (mostly Windows 8 onwards) should read the following links first):
This is really good!:
http://www.everydaylinuxuser.com/2014/05/install-ubuntu-1404-alongside-windows.html
http://www.everydaylinuxuser.com/2015/11/how-to-install-ubuntu-linux-alongside_8.html
http://www.everydaylinuxuser.com/2015/11/how-to-install-ubuntu-linux-alongside.html
"Disable Fastboot" (AKA: Fast Startup / Quickboot):
http://winaero.com/blog/how-to-disable-or-enable-fast-startup-in-windows-8-1/
Okay, I have created my bootable disk/USB stick, now what?.
You first need to make sure that your computer is set to boot from your disk or USB stick, when you first boot your PC (switch it on), you will very briefly see options on the screen to enter your BIOS where you can change the “Boot Order” of your PC, this varies from PC to PC, on my HP Compaq, I have to press the “Esc” key to change the boot options (select to boot from the hard drive (HDD), CD/DVD or USB), on my laptop, I need to press the “F12” key, on other PC's; you might have to “Press “F1” or “F2”, or “Del”, as soon as you see your PC's boot logo, press the pause button and it will stop the boot process so you can read the screen and decide which button you need to press to select your boot media, you may have to enter BIOS if your PC doesn't have a “Boot Order Selector”, see the following links:
Okay, I've changed the boot order but I don't know what to do next?.
Insert the disk or USB stick into your PC and restart and your computer should (all being well) now boot to the first page of the Ubuntu disk which oddly enough is basically blank with keyboard symbol and little man visible, it is important for you as a beginner to press “any key” as soon as you see this symbol so you will get a better idea of what is going on during the initial boot process:

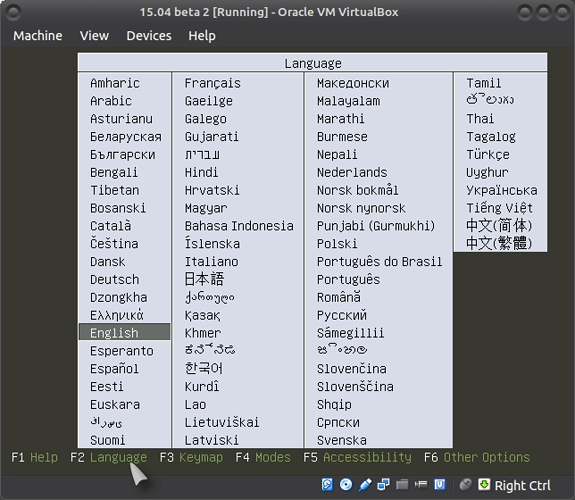
For the entire system default language, press “F2” and the language will change and remain that way through the use of the live CD, the default language in this case; is English:
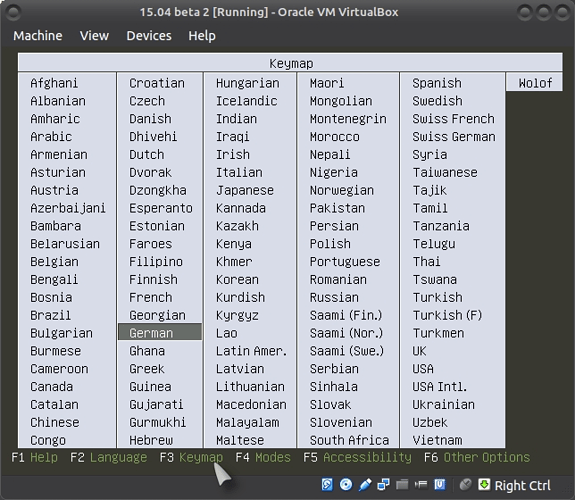
To change the language for your keyboard, press “F3”:
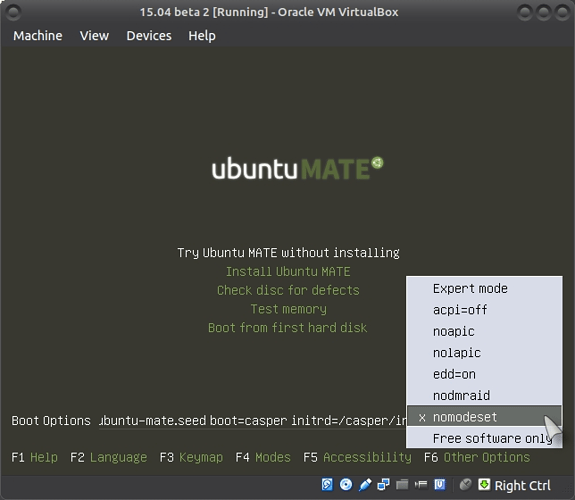
Pressing the “F6” key will enable you to make changes to the boot parameter options with regards to switching to a safer boot mode for your PC should you have problems with your graphics card (or other hardware components), you can select different options such as “nomodeset” or “noacpi”:
See this link for a full explanation of Boot Parameters:
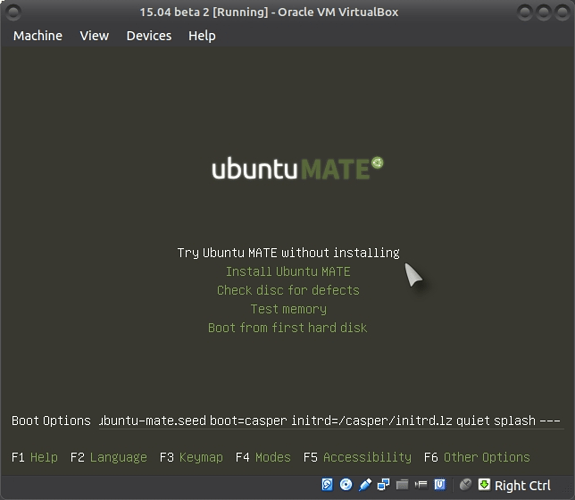
Now select the top option: “Try Ubuntu (MATE) without installing”:
Okay, the Live CD/USB stick booted successfully and I now have a working desktop, what should I do now?.
First and foremost, make sure that the following things work without problems:
1: Check that your network is working and that you have an internet connection, this applies to both LAN and WiFi, please see the following links:
2: Check that you have sound, the sound is normally set very low so you can either click on the sound applet in the panel or go to Control Center/System Settings > Hardware > Sound and use the “Test Sound” function making double sure that the sound is not muted!.
3: Switch your printer on and see if it is automatically recognized, if not go to Control Center/System Settings > Hardware > Add printer and hopefully it will install no problem.
4: Play around a little and make sure that you familiarize yourself with your new operating system, make sure you know what does what, you don't have to play around too long, certainly make sure that the system is stable and not jumping all over the place or that your PC isn't exploding in front of you!. (NB: A live CD/USB stick will run much slower on older PC's with little Memory and lower powered CPU's!).
Alrighty then!, everything works, now what?.
You now have to decide whether you wish to install Ubuntu alongside Windows/Mac (Dual Boot), or whether you only wish to install your preferred version of Ubuntu (Wipe entire drive. See the warning at the very beginning of this guide!). See the partition guides if you don't know anything about partitioning:
Windows users:
Mac users:
I recommend you pre-format your hard drive (HDD) first and then use the “Something Else Method” when installing, this is my personal preference!. The Gparted partitioning guide is there for those of you that have never done any partitioning, using different scenarios, make sure you DEFRAGMENT WINDOWS BEFORE RESIZING YOUR PARTITIONS IF YOU INTEND TO KEEP WINDOWS AND DUAL BOOT!:
Install guide for using the “Something Else Method”, after you have previously created your partitions using Gparted partitioning tool, is also explained below!:
Basically there is little difference between using the “Something Else Method” and letting the Ubuntu installer take care of the partitioning, the difference is that I recommend you use 3 partitions, 1 swap, 1 root and 1 home, that way, if you ever have to install again, you can keep all your data and files in your home folder intact without the need to re-copy them to the hard drive!. (Assuming you do it correctly!).
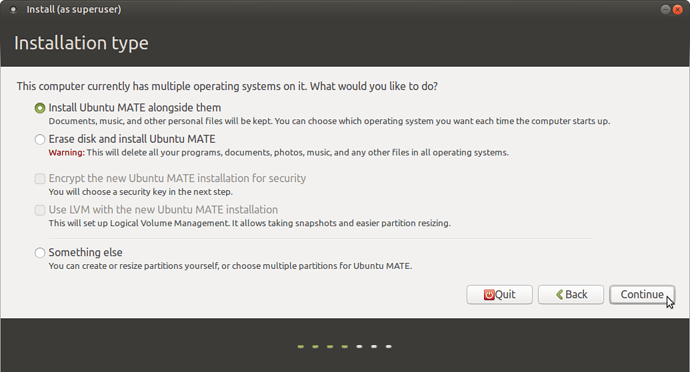
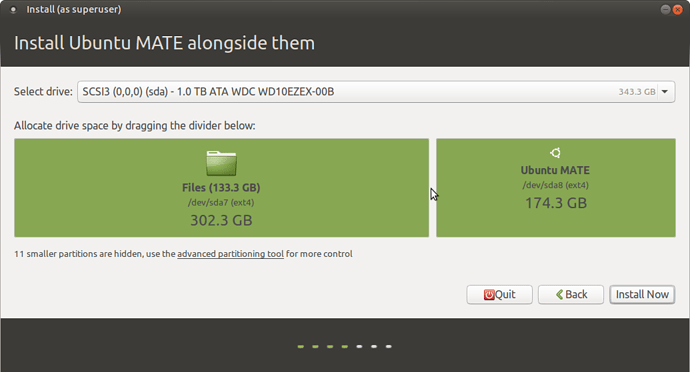
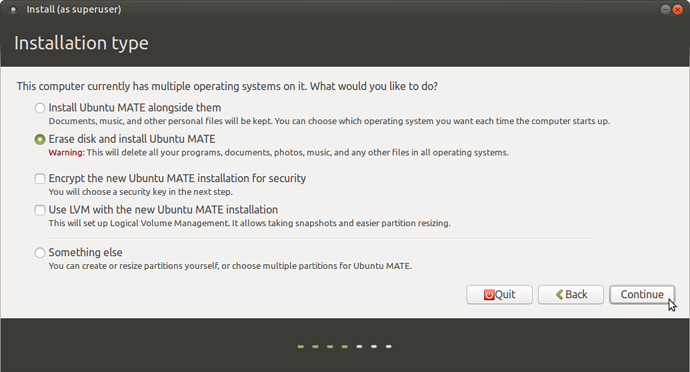
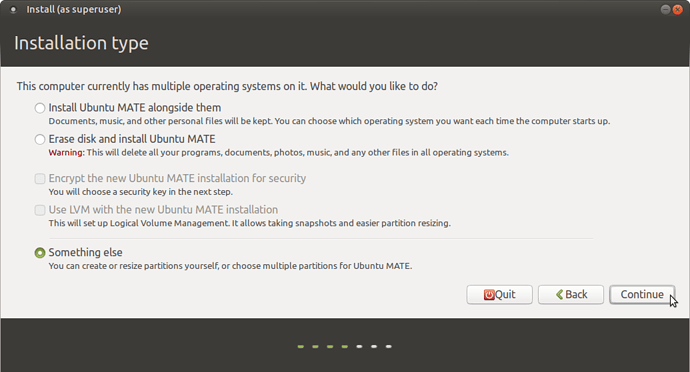
If you look at the following pictures (step 4 of the basic install), you will see that there are 3 basic options open to you, the first option (Install Ubuntu (MATE) alongside them) will allow you to resize the Windows partition and decide how much space you want to sacrifice for your Ubuntu install and will take out any problems you may have with partitioning.
(You will notice that an Ubuntu version is already installed and the second picture is only for demonstration purposes):
Here you can drag the box on the left with the mouse to the desired size, leave enough space for Windows!.
The second option: (Erase disk and install Ubuntu) WILL WIPE YOUR ENTIRE DRIVE SO BE CAREFUL WITH THIS OPTION IF YOU HAVEN'T SAVED ANY OF YOUR FILES; STOP NOW AND CANCEL THE INSTALL AND CREATE YOUR RECOVERY DISK SET IF YOU DON'T HAVE A WINDOWS/MAC INSTALL DISK!.
It will basically auto-install from then on erasing the entire disk and all your files with it, it will create only 2 partitions, a swap partition (used to enhance the system memory) and a unified root and home partition. ONLY USE THIS OPTION IF YOU WANT TO COMPLETELY WIPE YOUR HARD DRIVE!.
And the third option will allow you to select which partitions you wish to use assuming you have already created them and you intend to use the “Something else Method” as described above!.
Okay, I've got all that, now what?.
Now you need to start the install process which is only a few steps and may take about 30 minutes of your time!.
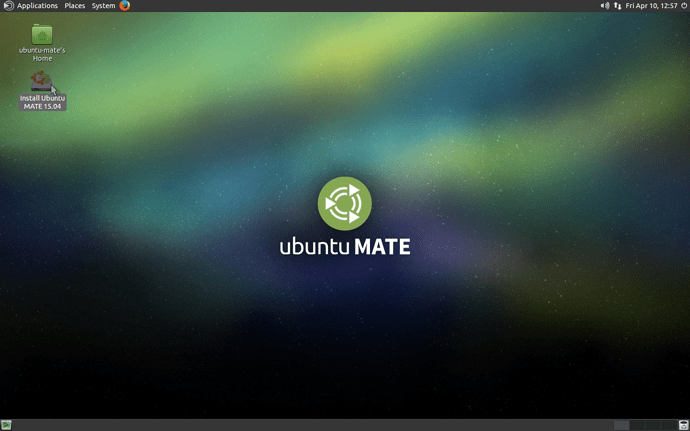
Click on the installer button on the desktop and the install process will start:
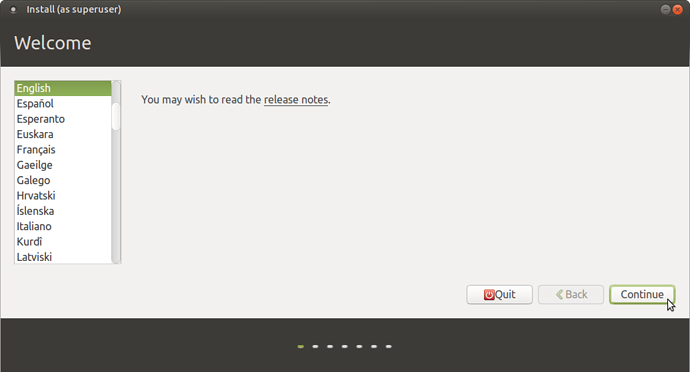
Select your preferred language and click on "Continue".
Pic 1:
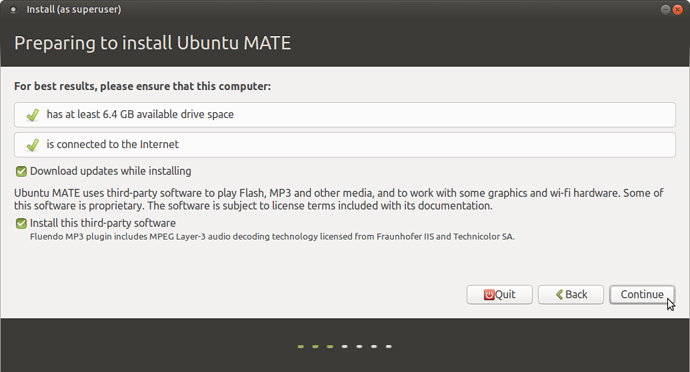
Make sure you have an ”active internet connection” and if you are using a notebook/netbook; that you have it “plugged in to the mains” and it is not running on battery power alone!.
Put a tick in both the boxes "Download updates while installing" and "Install this third-party software" and then click on "Continue":
Pic 2:
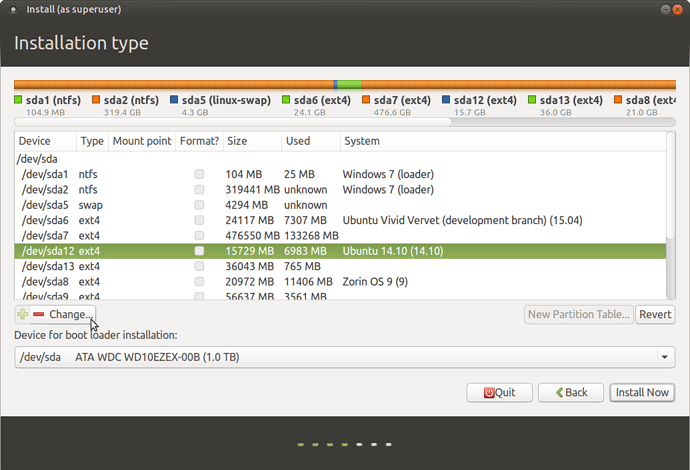
At the screen "Installation type", select your preferred install method and continue, this guide will carry on using the "Something Else Method" as the first two options speak for themselves. Select your desired option and click on "Continue". If you don't want to use the “Something Else” option, just skip reading the next few sections!:
Pic 3:
Assuming you already have a "swap" partition, there is no need to re-do it as it will be automatically detected by the system!. (Or if you selected one of the first two install options!).
Make sure that the "Bootloader" is set to install to "/dev/sda" which is where the normal "Master Boot record" (MBR under Windows and Grub Bootloader in Linux) is contained!. (Where it states "Device for boot loader installation" just beneath the plus/minus/Change buttons).
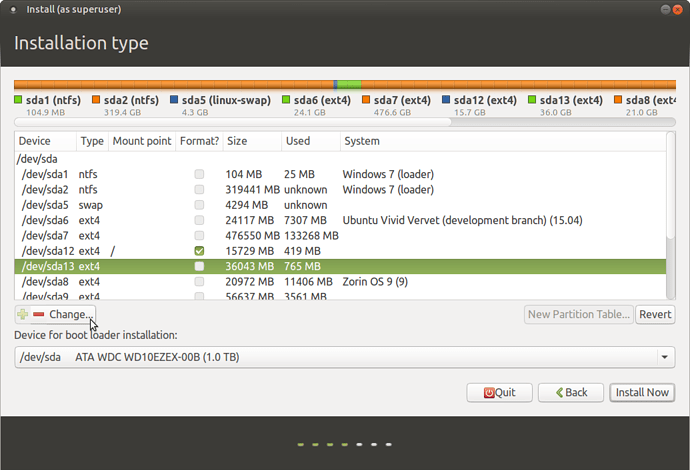
Now here you need to highlight the partition that you want to place your "root" ( / ) mountpoint, in my example; I highlighted partition "sda12" which already has Ubuntu 14.10 installed on it and for the purpose of this tutorial; is being erased:
Pic 4:
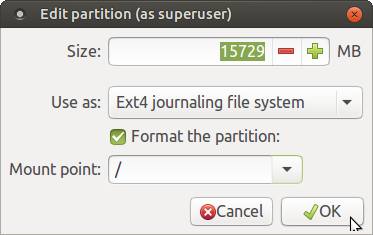
Once the desired partition has been highlighted (/dev/sda12), click on the "Change" button and the "Edit partition" Window will open which is where you need to set your: File type mountpoint and format option:
Now select "Use as" = Ext4
Format the partition = "Yes" (Put a tick in the box!)
Mountpoint = "/" (Forward slash)
Click on "OK" If you are certain that the changes you just made are correct. Remember that you cannot "UNDO" this operation once you commit and click on the "Continue" button in the next window:
Pic 5:
After clicking "OK", this window will open an all you need to do is click on "Continue":
Pic 6:
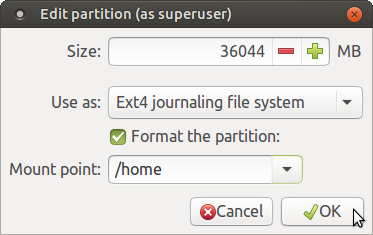
Now select (highlight) the partition you want to use as your home and click on "Change", in this case, it is partition “/dev/sda13”.
Pic 7:
Now select "Use as" = "Ext4"
Format the partition = "YES".
Mountpoint = "/home" (Forward slash and the word "home")
Click on "OK" if you are certain that the changes you just made are correct:
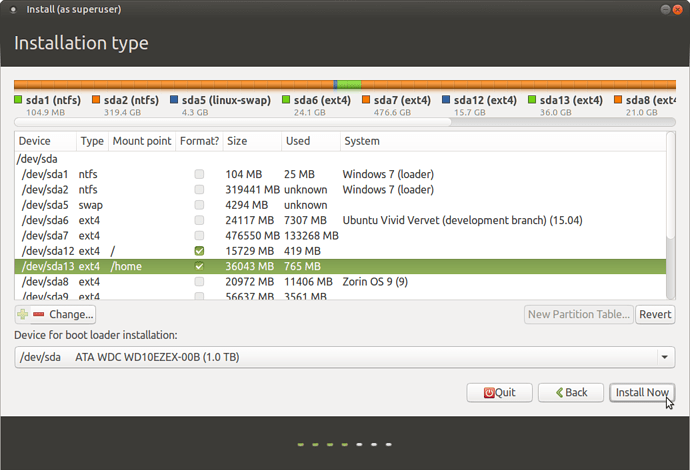
Pic 8:
You will see from this pic that there is a tick in the box "Format". IF YOU ARE DOING A NEW INSTALL, FORMAT IT!.
Now if you were doing a repair install, you should leave that box unchecked and this will keep all your data intact in your previous home folder with all your bookmarks, music, pictures etc.
Click on "Install Now" when you are happy that everything is as you want it!:
Pic 9:
You will get a final warning, click on “Continue”:
Pic 10:
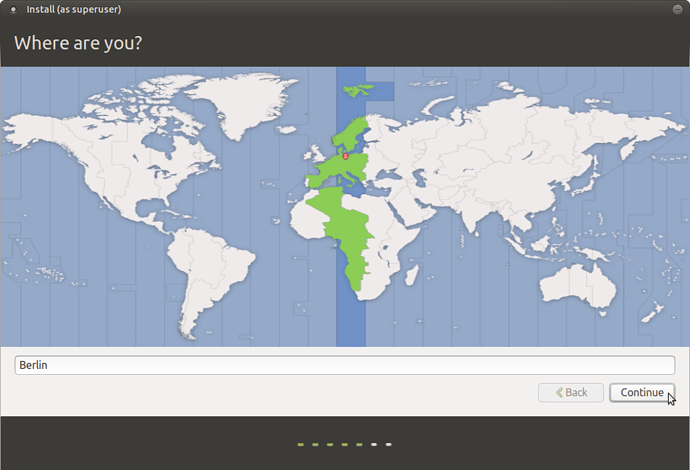
Select your region and click on "Continue":
Pic 11:
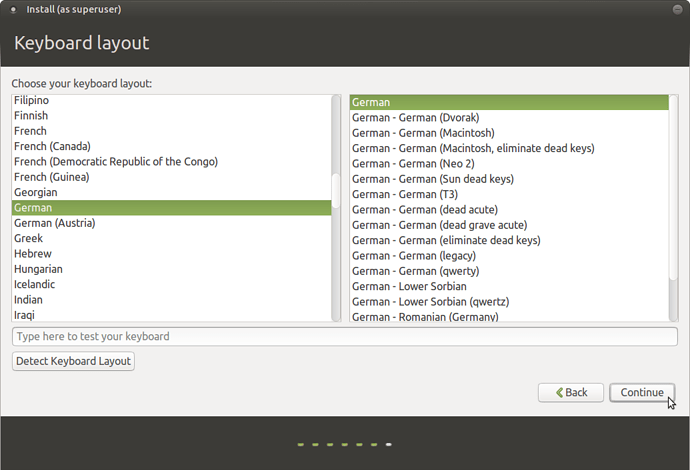
Select your keyboard layout, test it if you wish and click on "Continue":
Pic 12:
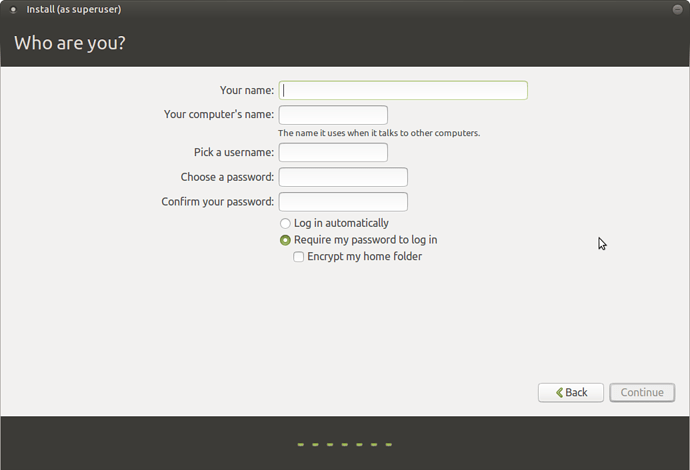
Who are you?. Enter the required details and click on "Continue:
(I advise you not to encrypt your home folder as this has led to problems in the past with Ubuntu based systems!)
Pic 13:
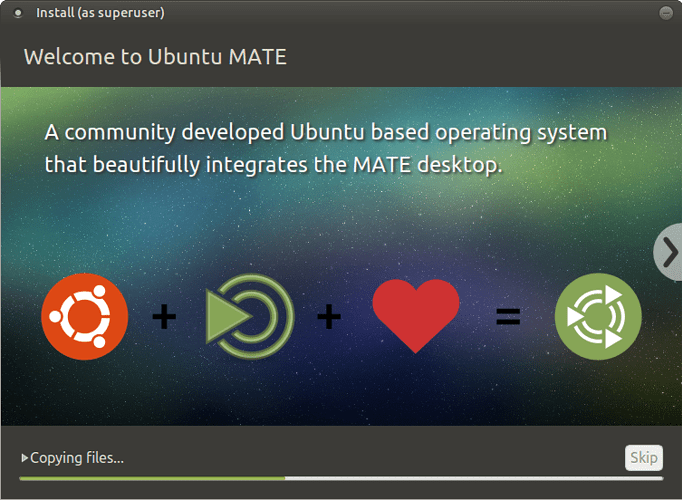
Wait for the installation to finish:
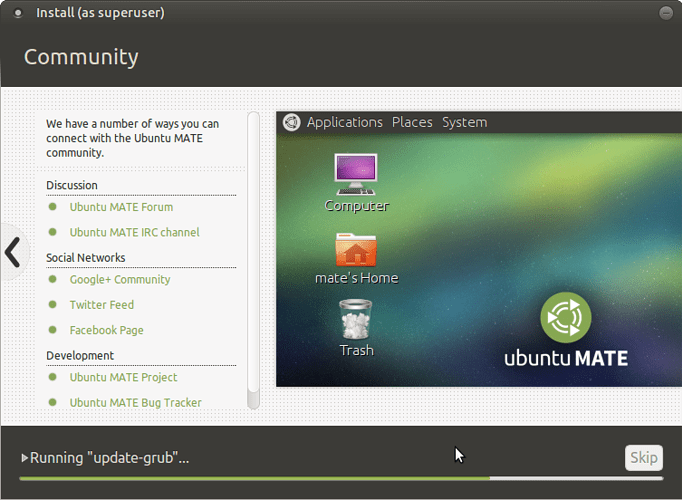
Pic 14:
Pic 15:
Installation Complete > click on "Restart Now":
Pic 16:
Please note:
When the PC restarts, it will stop at a certain point and tell you to remove the disk/USB stick and press "Enter", the PC may not react and the keyboard may go dead on you, the only way left is for you to do a "Soft Power Off", press and hold the power button until the PC switches itself off (normally about 4 - 5 seconds), hold the button in until it does so, DON'T QUICKLY PRESS THE BUTTON!:
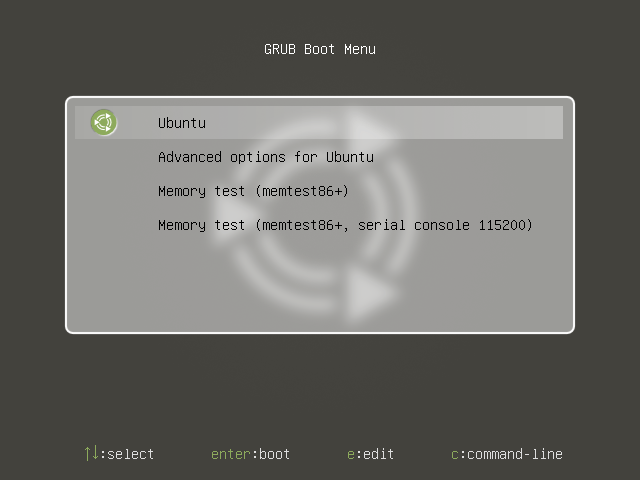
Once you have restarted, if you have a dual boot system, the first option in the Grub boot menu window will be Ubuntu, if you want to boot into another operating system like Windows, use the up/down arrow keys to navigate to it, the Windows boot entry will most likely say something like: “Windows (Loader) (on /dev/sda1) (or /dev/sda2 or /dev/sda3 etc)” or something similar, you will know it when you see it!:
Grub Boot Menu:
If you only installed Ubuntu after wiping your drive, you may get a window like this. (If you don't see the window on the first boot, when you reboot, press either the “Esc” key or “Shift” and the menu should appear!).
You will see that the second option allows you to go into advanced mode and subsequently into “Recovery Mode” / ”Advanced Options”:
Okay, everything is installed and up and running, what now?.
Once you boot into your newly installed version of Ubuntu, it is very important to run the system updater, take a look at the update guide for more detailed information on this subject:
Below is a quick start guide for you.
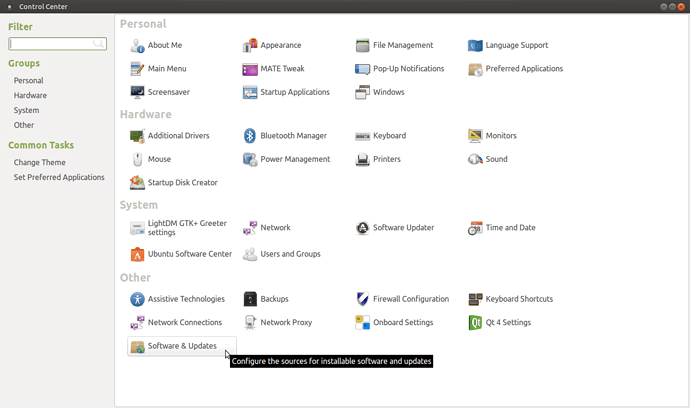
First, open Control Center (System Settings) > Other > Software & Updates:
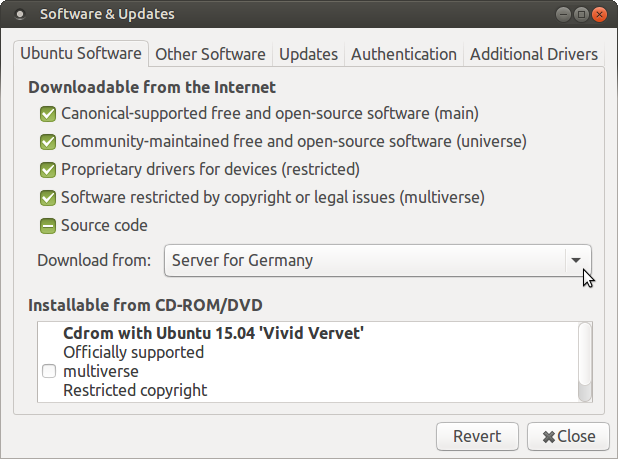
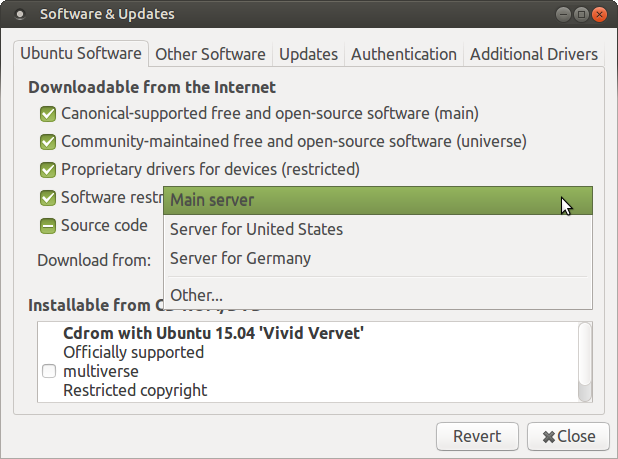
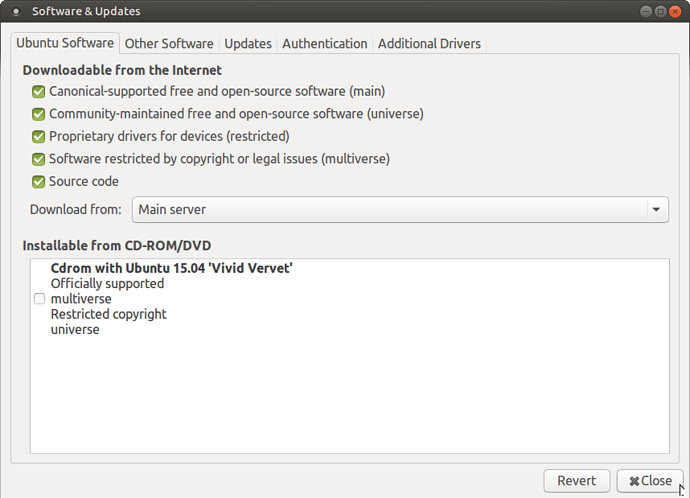
The following window will open and I suggest you select “Main” where it states “Download from”:
Click on the drop-down menu and select “Main server” (this is what I recommend, you can leave it alone if you wish!):
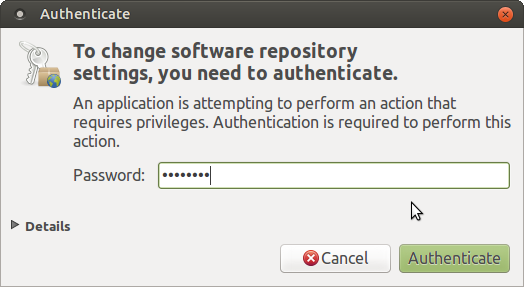
Enter your password:
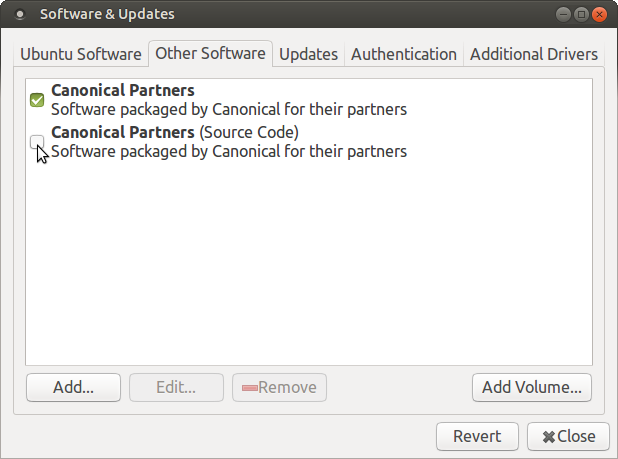
Now go to “Other Software” and mark the box(es) for Canonical which will allow you to download "Non-Free Software" like Skype:
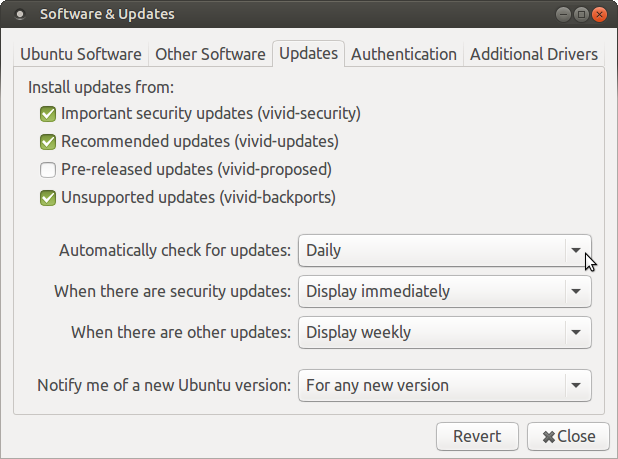
Check your “Updates” settings and set them to your liking:
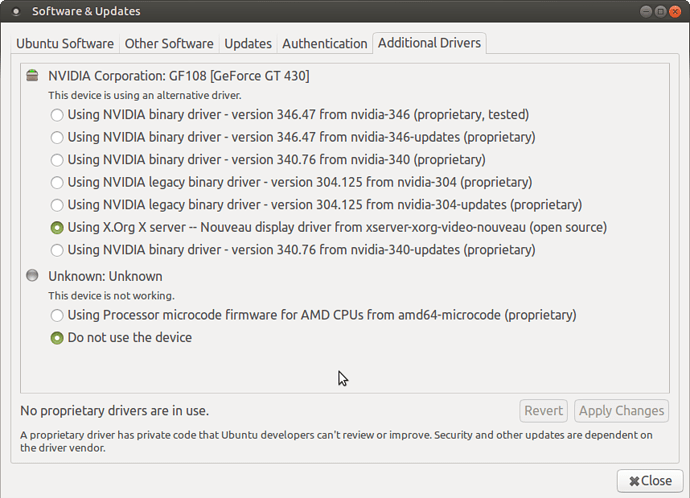
To install your graphics card drivers (AMD /ATI and Nvidia only!) and drivers for other hardware like wireless adaptors, use the “Additional Drivers” tool. DO NOT USE THIS TOOL BEFORE YOU HAVE DONE A FULL FIRST UPDATE!.
See also:
SIS graphic card owners should read this:
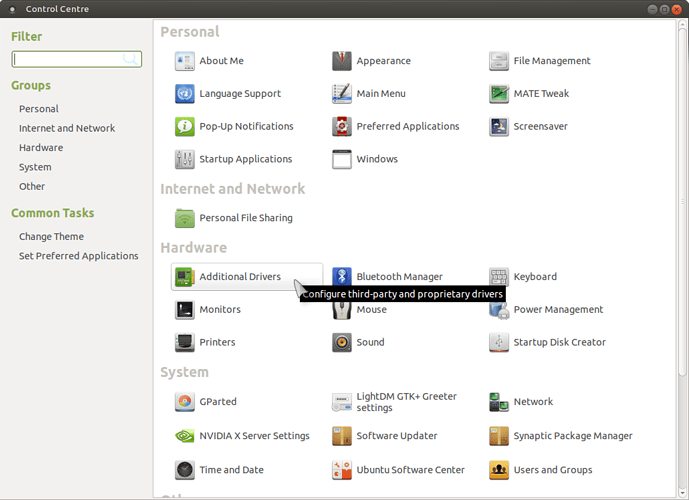
You can use the Additional Drivers tool after updating in: Control Center > Hardware Additional Drivers:
Once the settings are to your liking, click on “Close”:
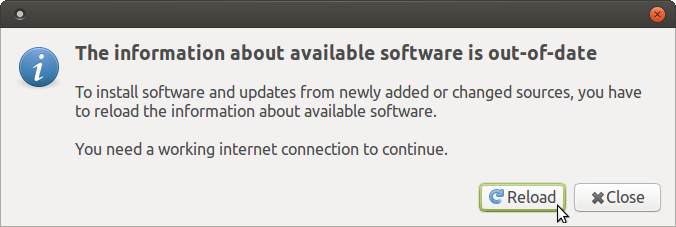
Click on “Reload” when the message appears:
Wait a short while:
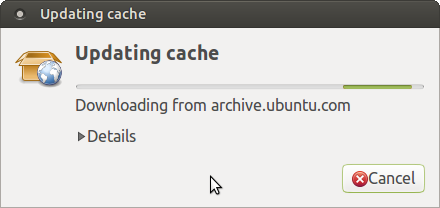
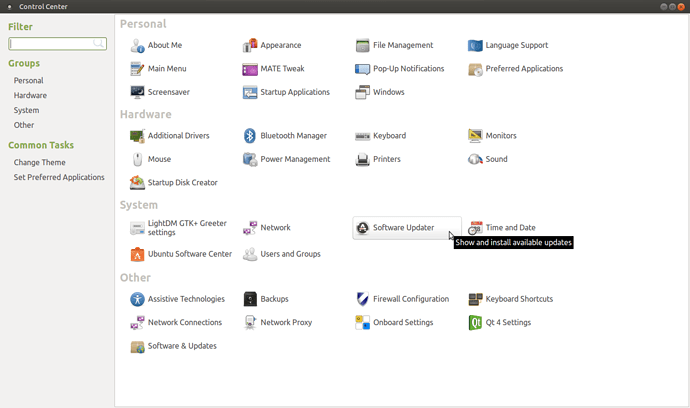
Now go to System > Software Updater, click on the icon to start:
It will check for updates again, let it!:
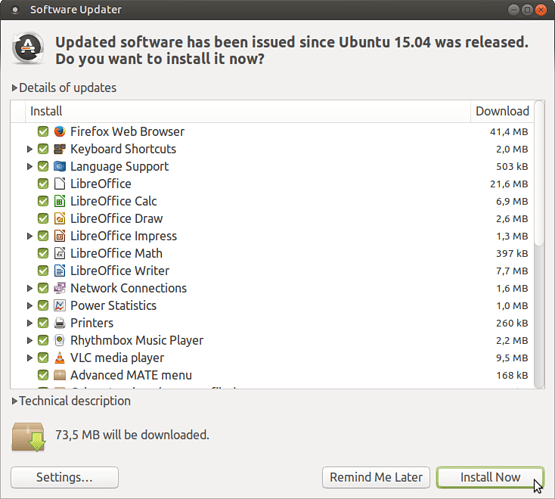
Once it has loaded the necessary info from the main server, all the boxes are automatically ticked and you just to click on “Install Now”:
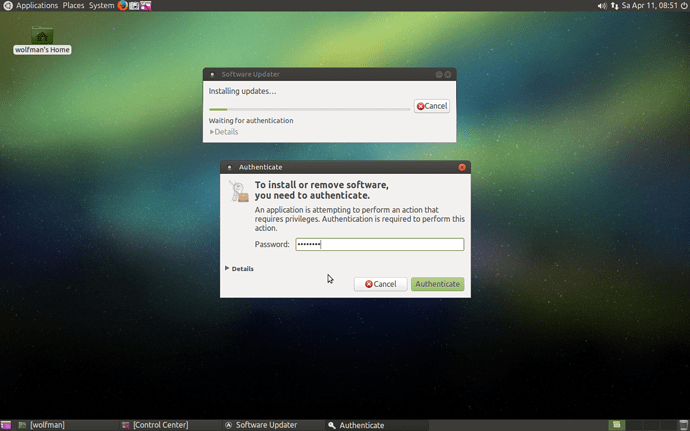
Enter your password when asked:
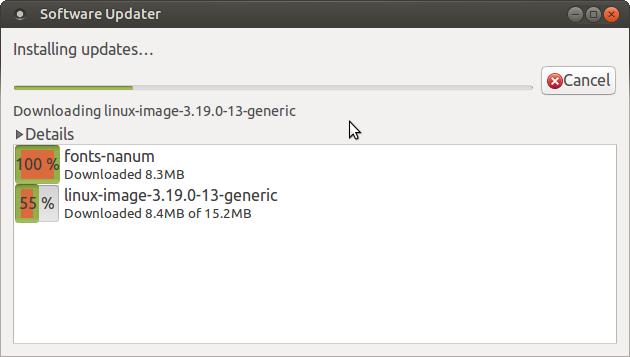
Wait for it to finish:
Click on “Restart Now” when and if the message pops up. (I recommend always restarting after updates even if not reminded to do so!):
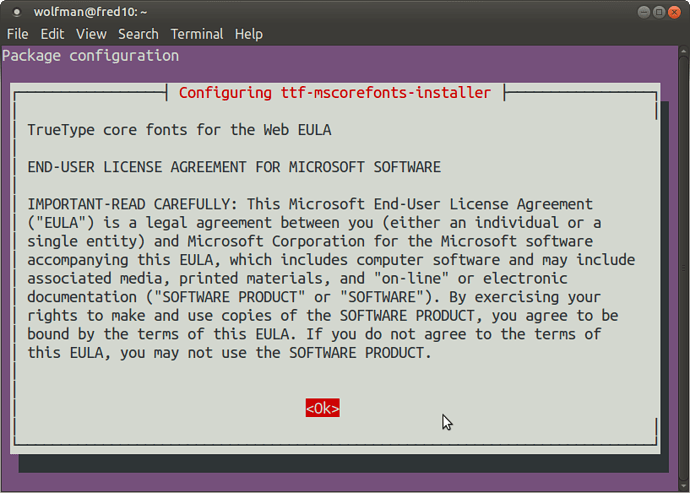
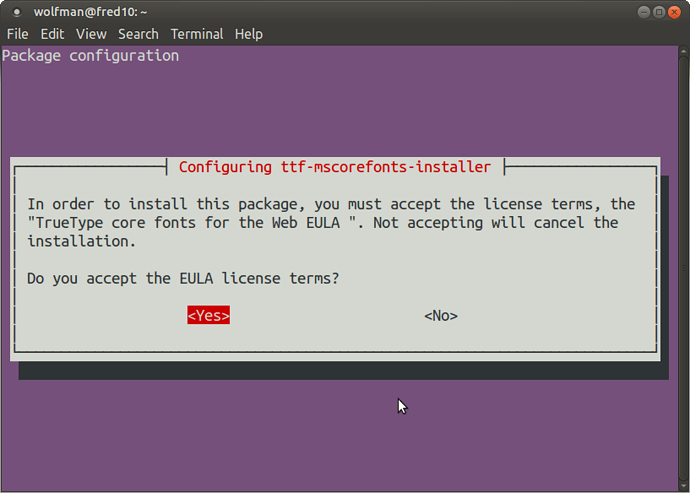
You might get asked to accept license agreements for non-free software, you should say “Yes” otherwise it won't install, if it appears in a terminal window, press the “Tab” key to navigate, equally, if you are asked whether or not you want to keep or replace a file, always say “Yes” (Replace):
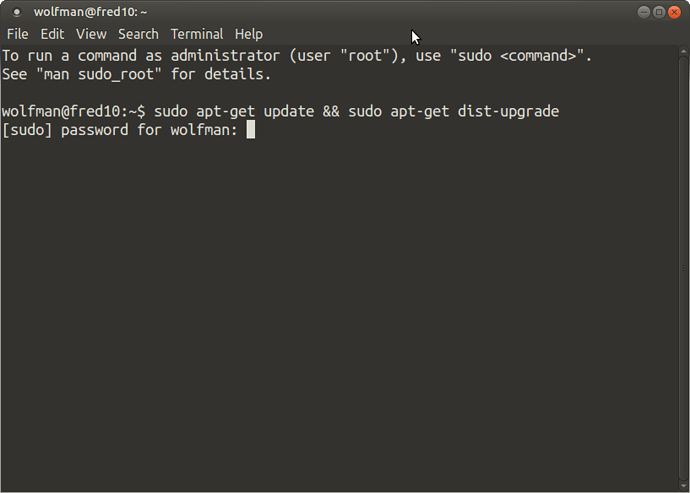
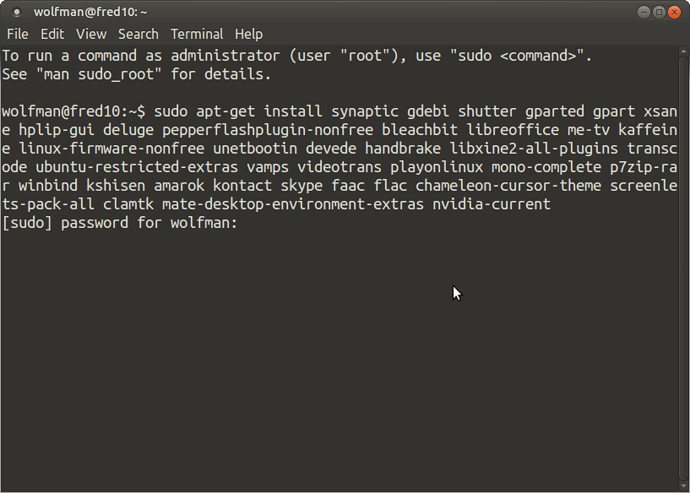
You can also use the terminal to update, the pics below are just examples, please see the main update guide link provided above for more detailed information!:
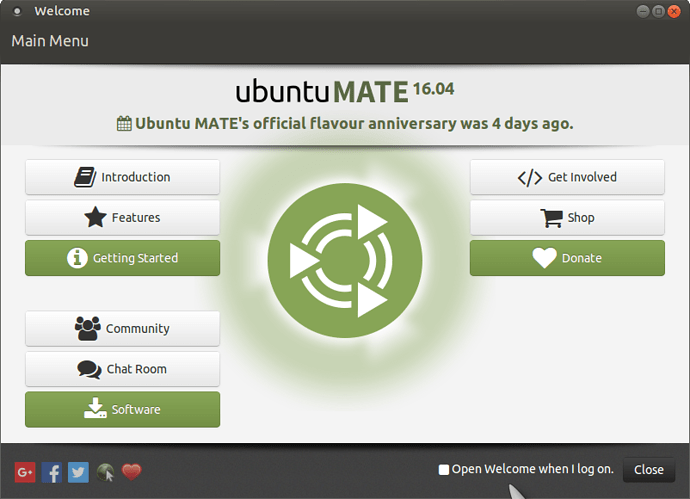
To install applications without having to struggle around the web looking for apps, as a beginner, I recommend you use the "Welcome" tool (Ubuntu Mate only) Top panel > System > Welcome (Ubuntu Software Center in other flavours of Ubuntu). The welcome tool has a wealth of information which will prove very useful to any beginner or indeed new users to Ubuntu mate!. ![]()
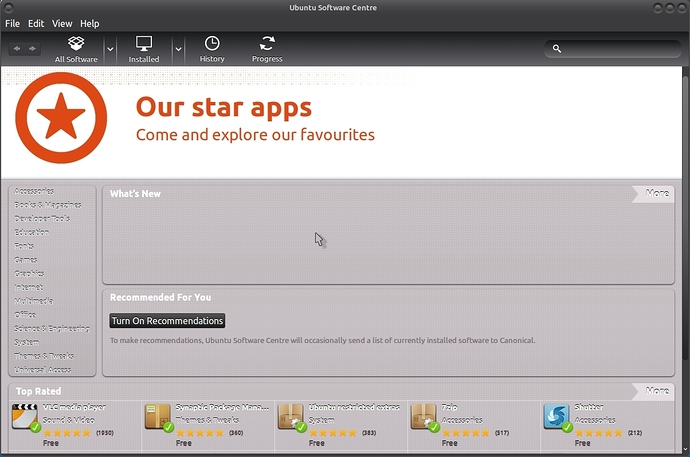
In Ubuntu Mate, you will find the Ubuntu Software Center in the Main Panel Menu > System> Administration > Ubuntu Software Center (In Ubuntu Mate 16.04 it is called "Software Boutique). You can add an icon to the desktop by right clicking and add to desktop.
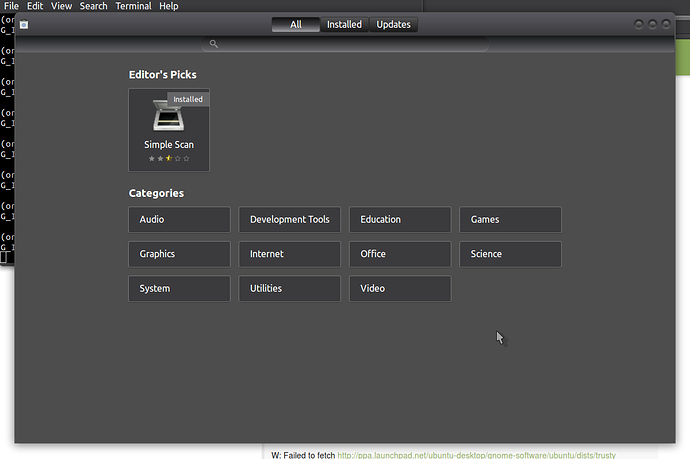
From Ubuntu 16.04 on, Gnome Software Center will replace Ubuntu Software Center and it will look something like this:
Do I need AntiVirus software in Linux?:
A good question which can lead to some confusion as to whether or not any AntiVirus app is really necessary, please read the following link for more info and you can decide for yourself!:
Mate desktop guides here:
There really are 3 links, they aren't the same link 3 times!. ![]()
VNC users look here:
Right, that's it, if you have any questions, please feel free to post them on your preferred Ubuntu flavour forum!.
I hope this has been of help to you!. ![]()
Remember!, Ubuntu operating system and its family is free now and for ever, if you are on a website where they want money from you, close the page and go to the Ubuntu download links above!. ![]()
Other links:
Complete Ubuntu installation guide which is really for advanced users but offers many snippets of helpful information!:
https://help.ubuntu.com/16.04/installation-guide/amd64/install.en.pdf
